


1. INTRODUCTION
The electronic trading system (hereinafter the ETS) administered by the Operator of the Lithuanian Energy Exchange (hereinafter the Operator) enables placing trade offers for acquiring fuel products, concluding electronic transactions of purchase and sale of fuel, and administering actions connected with delivery of fuel.
Trade in fuel via the ETS takes place according to the Rules of Centralised Trade in Biomass, the Energy Exchange Regulation (hereinafter the Regulation), the Conditions of Trade in Biomass Products, and the Typical Conditions of Fuel Supply of approved by the Operator. Documents regulating trade in the Exchange published on the Operator’s website at www.baltpool.eu/en/energy-exchange-documents/.
The purpose of this manual is to advise users on the use of the ETS as they perform fuel trade-related functions.
1.1. Terms used, elements for entering and managing information
Table 1
Terms
|
Term |
Description |
|
Fuel product |
A combination of a fuel type and a delivery period. |
|
Fuel type |
A type defines fuel with specific quality parameters and fraction that is traded in the Exchange. Read more in the Conditions of Trade in Biomass Products. |
|
ETS |
An electronic trading system, which a user logs to trade in the Exchange. |
|
Fuel delivery shedule |
An agreement between a Buyer and a Seller regarding the fuel supply according to an effective transaction. |
|
Order |
A legally binding offer and/or acceptance placed by an ETS user to conclude a transaction in the Exchange on conditions specified in the respective order. |
|
Account |
An ETS account intended for the user’s trade via the ETS. |
|
Trading location |
Factual fuel locations or delivery locations specified by users. |
|
Trading session |
A time period from the start of placing orders in the Exchange until announcement of the final results, which starts at 8:00 a.m. of the third business day of a week and ends at 10:30 a.m. (for Buyers) and 11:00 a.m. (for Sellers) of the second business day of the succeeding week. |
|
Delivery period |
A time period for physical delivery of fuel defined as a specific one-week, one-month, one-quarter or half-year period. |
|
Toe |
Tonne of oil equivalent. It is an energy measurement unit equivalent to 11.63 MWh. |
|
Contract |
An agreement concerning purchase and sale of fuek products on conditions specified in the respective orders and concluded based on users’ order to buy and sell the fuel. |
|
SM1, SM1W, SM2, SM3, MG1, MG2, MG3, KD |
Fuel type code. |
|
Instruments of security of fulfilment of obligations (hereinafter – Collaterals) |
Collaterals provided by a member to the Operator to secure the fulfilment of obligations connected with trade in the Exchange and satisfying the requirements set in the Regulation. |
Table 2
System elements description
|
Element |
Description |
|
[Button] |
In the text, clickable buttons (also called command buttons) of the trading system windows, are placed in square brackets []. The name of the respective button is specified in the square brackets. In the ETS, they are displayed as square buttons and active links (text). |
|
/Menu/ |
Slashes (//) in the text indicate items of the ETS menu and/or submenu. The name of the menu and/or submenu item is specified between slashes. |
|
Link |
Active links in the ETS and in the manual are specified in blue. After an active link has been clicked, the respective selection will be displayed. The text of the link describes its intended purpose. |
| |
The element for choosing a value. After [ |
| |
The data entry element. Depending on the intended purpose, numerical or textual values can be entered. The required value must be entered by means of a keyboard, after the element has been activated by means of the left mouse button. |
| |
The selection box. The text next to the box describes the possible steps. The box shows whether the specific value or condition has been selected or not. The user can change the box value by ticking or unticking the value in the box by means of the mouse. |
| |
The checkbox. The text available next to the box describes the possible step or selection. The box shows whether one of the possible values has been selected or not. The user can tick the required box by means of the mouse. |
| |
The closing element. After the element has been clicked by means of the left mouse button, the respective informational message will be closed. |
|
|
The order placement time marking element. The green background of the element means that orders to buy and/or to sell are accepted in the ETS. |
|
|
The order to buy placement time marking element. The orange background of the element means that the time for placing orders to buy has ended and that such orders can only be withdrawn from the ETS. |
|
|
The order placement time marking element. The red background of the element means that the time for placing and withdrawing orders to buy and/or to sell has ended. |
| |
The additional information element. Information can be provided by highlighting the element by means of the left mouse button. |
| |
The document download icon. The selected document will be downloaded by clicking the left mouse button on the icon. |
| |
The document view icon. The selected document will be opened by clicking the left mouse button on the icon. |
| |
The Buyer’s trading location icon on the map of trading locations. After the cursor has been placed on the icon, the trading location information will be displayed. |
| |
The Seller’s trading location marking element on the map of trading locations. After the cursor has been placed on the icon, the name of the respective trading location will be displayed. |
| |
The declared reserve location marking icon on the map. The information about the respective declared reserve location will be displayed by placing the cursor on the icon. |
| |
An order to sell and/or to buy without the marking symbol in the left upper corner of the rectangle shows that the minimum transaction amount of 30 toe has been set for the order. |
| |
The order to sell or to buy with a yellow triangle in the left upper corner of the rectangle shows that the minimum transaction amount of 90 toe has been set for the order. |
| |
The order to sell or to buy with a red triangle in the left upper corner of the rectangle shows that the minimum transaction amount of 180 toe has been set for the order. |
| |
The order to sell or to buy with a black triangle in the left upper corner of the rectangle shows that the minimum transaction amount (toe) set in the order coincides with the order amount. This marking may apply when the amount (toe) being purchased or sold is at least 60 toe. |
| |
The order to sell or to buy with a red railway sign in the left upper corner shows that delivery according to this order must be implemented by railway only. |
| |
The order to sell or buy wood pellets with a grey S in the left bottom corner of the rectangle shows that delivery according to this order must be implemented in big bags only, which will be unloaded by the Seller. |
| |
The order to sell or to buy wood pellets with a grey B in the left bottom corner of the rectangle shows that delivery according to this order must be implemented in big bags only, which will be unloaded by the Buyer. |
| |
The order to sell or to buy wood pellets with a grey P in the left bottom corner of the rectangle shows that delivery according to this order must be implemented by pneumatic transport only. |
| |
The order to sell or to buy wood pellets with a grey sS in the left bottom corner of the rectangle shows that delivery according to this order must be implemented in small bags (10–20 kg) only, which will be unloaded by the seller. |
| |
The order to sell or to buy wood pellets with a grey sB in the left bottom corner of the rectangle shows that delivery according to this order must be implemented in small bags (10–20 kg) only, which will be unloaded by the Buyer. |
| |
Structure of information of an order to sell or to buy: · The first digit specifies the fuel purchase or selling price. · Second upper digit – the weekly order amount expressed in toe. · Second bottom digit – the preliminarily executed weekly order amount expressed in toe. |
| |
The digits of an order to sell are marked in green when a preliminary transaction is concluded for the entire or a part amount of the order to sell. |
| |
The digits of an order to sell are marked in red if the price of the order to sell exceeds the price specified in the respective order to buy. No transactions are concluded based on such orders to sell. |
| |
The digits of an order to sell are marked in black when no preliminary transaction is concluded based on this order to sell because the price of the order is higher than the prices of other orders to sell and the respective order to buy is executed against sell offers with lower prices. |
| |
Orders placed by a logged in user are highlighted in blue. |
1.2. Electronic Trading System
The ETS is accessible from any computer with internet access and a browser installed. You can use Internet Explorer (version not older than 10), Mozilla Firefox, Google Chrome or Opera. The Operator recommends using the latest version of the respective browser.
The ETS consists of three sections, i.e. the public account accessible to anyone, user accounts provided to registered participants of the Exchange, and the Operator’s account intended for the Operator of the Energy Exchange, BALTPOOL UAB. The ETS user manual describes the functions performed in user accounts.
Start your internet browser and enter https://e.baltpool.eu in the address field. The public ETS account will be displayed in your browser.

Figure 1. Public ETS account
1.3. Main elements of the ETS
All ETS windows have the following main areas:
- Heading.
- Main Menu bar.
- Fields for entering data.
The ETS date, time and the information of the logged in user are specified in the heading (Figure 2, First area). After [Log out] in the heading field has been clicked, the session of the logged in user in the ETS will be terminated. For user’s information, a visual marking of the times when orders could be placed is provided in the heading, for more detail, please refer to the Table 2 ‘System elements description’.
The menu bar (Figure 2, Second area) contains links to the ETS data entry fields. The data entry fields are described in detail in sections with the titles corresponding to the respective menu items.
The contents of a page selected in the menu are presented in the data entry field (Figure 2, Third area); data can be entered or viewed here.

Figure 2. Main elements of ETS windows
All steps and selections in the ETS are performed using a mouse and a keyboard – by clicking active links and buttons and entering the required information by means of a keyboard.
1.4. Logging in to the ETS
The Operator provides registered users with an ETS username and password that a user must use to log in to its user account. Two steps must be performed to log in to the ETS. In Step I of the login element (Figure 3) of the public ETS account (Figure 1), the user must enter the username and password provided to him. Having entered the login information, the user must click [LOG IN].

Figure 3. ETS login element. Step I
After clicking [LOG IN] the ETS will sent SMS to the user’s mobile telephone number specified in the ‘Application to receive login details to the ETS of the Energy Exchange’. The code received in the SMS must be entered in the ETS login element Step II (Figure 4).

Figure 4. ETS login element. Step II
After you have entered the code, click [LOG IN]. In case of successful login, the ETS home window, i.e. the trading window, will be displayed (Figure 5):

Figure 5. Trading window
1.5. Errors of logging in to the ETS
If the user enters incorrect login information, an error message will be displayed.
- In case an incorrect username and/or password is (are) entered:
![]()
Figure 6. Error message
- In case the username and/or the password is (are) not entered:
![]()
Figure 7. Error message
- In case an incorrect SMS code is entered:
![]()
Figure 8. Error message
With consideration to the error message, the user must enter correct login information and click [LOG IN] once again.
1.6. Logging out of the ETS
You should log out from the ETS every time you end work with it. You can log out by clicking [LOG OUT] in the heading (Figure 2). After you have logged out, the public ETS account will be displayed (Figure 1).
If you do not use the ETS for 30 minutes, the system automatically logs out the user. Five minutes before the automatic logout, the ETS will display remaining time until automatic logout message (Figure 9).

Figure 9. Timer message
To continue working in the ETS, click [CONTINUE WORKING]. If the user does not extend the session, the ETS will automatically log out the user and will display the session expiry message (Figure 10).

Figure 10. Session expiry message
To log in to the ETS once again, click [LOG IN AGAIN]. The ETS login element Step I will be displayed (Figure 3).
1.7. Password reminder
If the user forgets its login password, he must click the Lost your password? link in the ETS login element Step I (Figure 3). The ETS opens a password reset element (Figure 11).

Figure 11. Password reset element
The user must enter its username or e-mail address and click [GET NEW]. After clicking command button, a password reset message will be sent to the user’s e-mail address and an informational message (Figure 12) will be displayed in the ETS.
![]()
Figure 12. Informational message
The user must follow the instructions contained in the e-mail message and click the link received in the e-mail message. After clicking the link, the ETS opens password reset window with a password’s sample and recommendations for a new one (Figure 13).

Figure 13. Password reset window
Click [Reset Password] after entering new password. The ETS will display an informational message (Figure 14). To log in, click the Log in link. After it, the ETS will display the ETS login window, Step I (Figure 3).
![]()
Figure 14. Informational message
From this moment on, the user must use the new password to log in to the ETS.
1.8. Password change
User can change login password under /Account settings/ in /Settings/ menu. Read more in section 5.1 ‘Account settings‘.
2. TRADING
2.1. Trading
User can see quotes for all fuel instruments under /Trading/ menu (Figure 15).
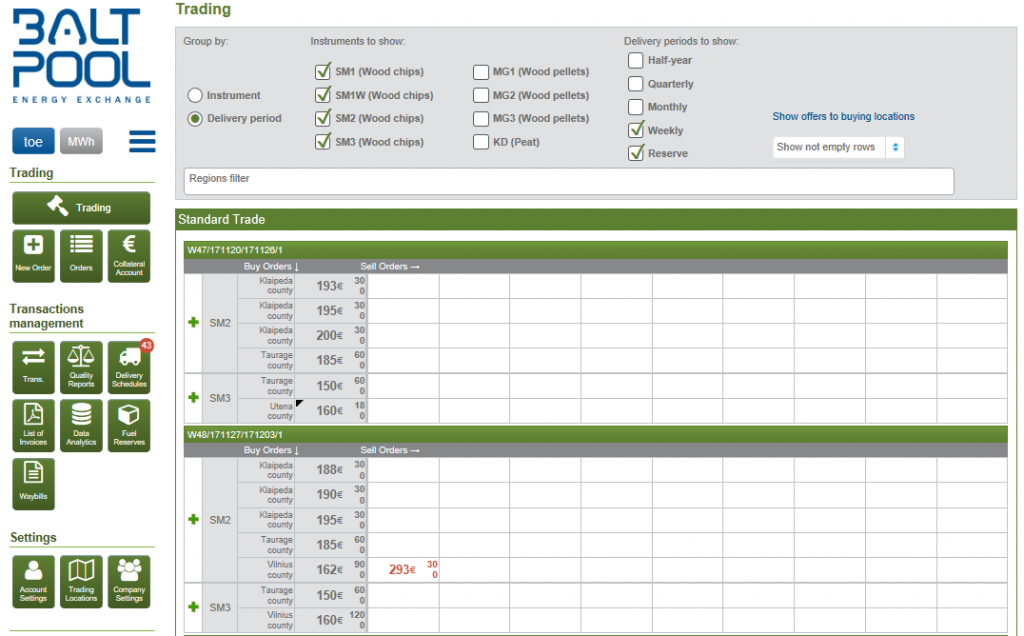
Figure 15. Trading window
User can select trading information view options by selecting it in information filter element (Figure 16).
Available options:
- To group information by instrument or delivery period;
- To select required instruments and/or delivery periods;
- To select orders view option in drop down menu:
- ‘Show not empty rows’
- ‘Show all rows’
- ‘Show only my Orders’
After options selection, the ETS automatically updates the information in the trading window.

Figure 16. Information grouping element
Buyers additionally can select ‘Show offers to buying locations’ option. After selection, the ETS displays rows of orders to sell for all the orders placed by the buyer (Figure 17).
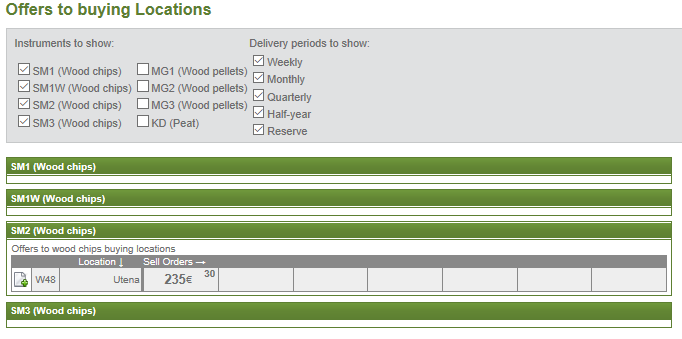
Figure 17. Offers to buying locations
2.1.1. Quotations table
Trade in the ETS takes place according to the ‘Standard Provisions of Contract of Purchase and Sale of Fuel’. Non-standard conditions of trade may also apply, according to which orders are placed into non-standard trade quotations tables, with clear specification of the applicable non-standard conditions of trade (Figure 18).
Rows of orders to sell are formed for each single order to buy in quotations tables. Orders to buy are listed vertically, in columns of the tables, with specification of counties in which purchases take place. A row of all orders to sell placed in the Exchange is formed for each single order to buy. A row includes those orders to sell in which the specified conditions coincide with the conditions specified in the respective order to buy. The price of an order to sell for each respective order to buy is adjusted based on the actual transportation distance to the specific buyer; consequently, the same order to sell will be displayed in other rows of orders to buy with different selling prices. Orders to sell are displayed in the order of precedence according to transaction conclusion principles. Read more in section 3.1 ‘Principles of contract conclusion and price setting’.
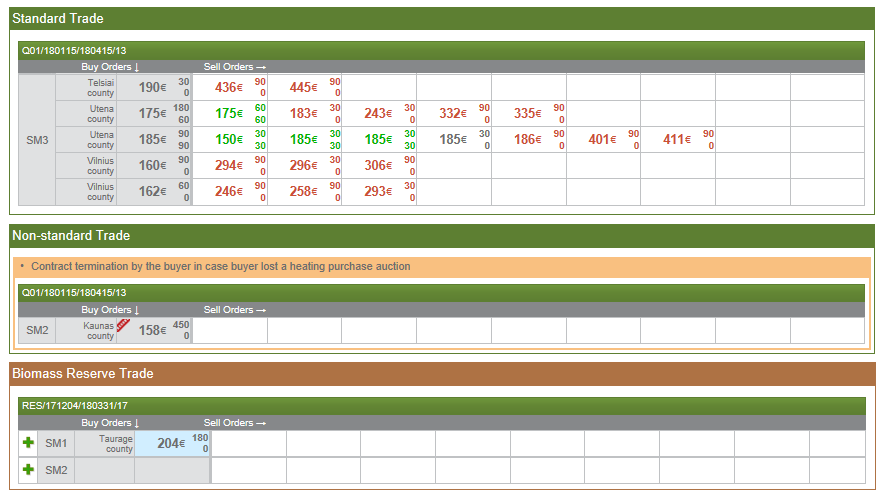
Figure 18. Quotatation table
Orders to sell in the table are listed using different colours. Meanings of individual colours:
- Green. A preliminary transaction can be concluded with this order to sell.
- Grey. The price of the order to sell is higher than the prices in competing orders to sell for this order to buy; therefore, the amount of this order to buy was executed against other orders to sell with lower prices.
- Red. The price of the placed order to sell is higher than the price specified in the respective order to buy; therefore, no preliminary transaction will be concluded with this order to sell.
2.1.2. ‘Active orders’ table
The ‘Active orders’ table contains information about orders placed by the logged in user.

Figure 19. Active orders table
Elements of the table ‘Active orders’:
- Buy/Sell – an order to buy or to sell.
- Trading location – the name of a buying or selling location specified in the order.
- Instrument – an object of trade: fuel type and delivery period.
- Order Amount
- toe/week – the weekly amount of an order. Not specified for biomass reserve products.
- Total, toe – fuel amount of an order per all delivery period.
- Not executed Amount
- toe/week – not executed weekly amount of an order. Not specified for biomass reserve products.
- Total, toe – not executed total amount of an order;
- Value, Eur – the value of not executed order.
- Duration, weeks – the number of weeks of a delivery period.
- Price, EUR/toe – fuel price per 1 toe. For orders to sell: the minimum selling price; for orders to buy: the maximum purchase price including delivery to the buying location.
- Executing amount, toe/week – the weekly amount preliminarily being executed at this auction.
Users may perform the following steps in the ‘Active orders’ table before expiry of the orders placement stage:
- Cancel orders placed in the Exchange. An order can be canceled by clicking the icon [
 ] next to the required order. Read more in section 2.4 ‘Cancellation of orders’.
 - Sign unsigned orders. An order can be signed by clicking the icon [
 ] next to the required order. Read more in section 2.2 ‘Signing of orders’.
 - Change price of an ‘Active’ order. The price can be adjusted by clicking the icon [
 ] next to the required order. Read more in section 2.5 ‘Adjustment of order prices’.
After any part of the order row has been clicked, the window (Figure 20) for changing the price of the placed order will be displayed. Read more in section 2.2.5 ‘Adjustment of order prices’.

Figure 20. Informational message with order data
2.2. New order
Orders can be placed via the ETS from 8:00 a.m. of the third business day of each week until the second business day (auction day) of the succeeding calendar week – by 10:30 a.m. for orders to buy and by 11:00 a.m. for orders to sell.
Orders are placed in the Exchange in two steps. During the first step, the order data must be entered. During the second step, the user must confirm that has familiarised himself and accept the conditions for placing orders and subsequently sign the order being placed.
The order data must be entered after selecting /New order/ in the /Trading/ menu or by clicking the icon [![]() ] in the quotations table in the trading window (Figure 21), next to the instrument for which the user wants to place the order.
] in the quotations table in the trading window (Figure 21), next to the instrument for which the user wants to place the order.
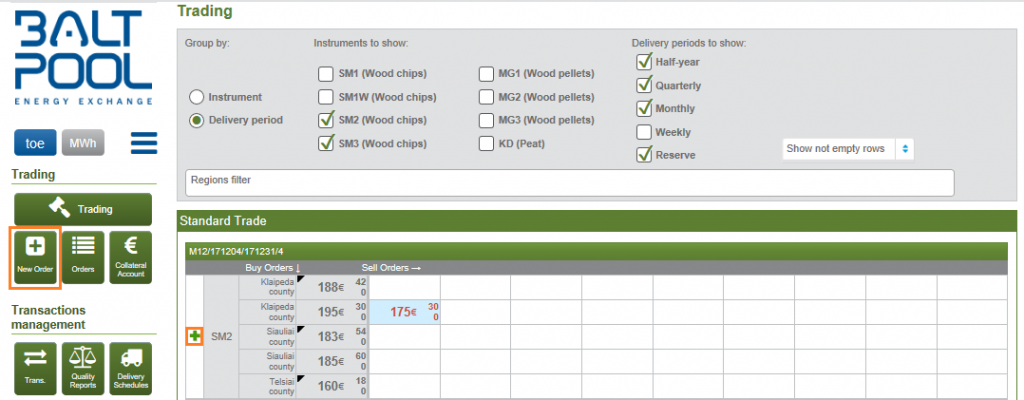
Figure 21. Trading window
The following information will be displayed in the window for entering the order data (Figure 22, Figure 23):
- Trading limit. The maximum value of new orders that may be placed with consideration to unused collaterals is displayed. The trading limit is calculated after a delivery period has been selected. After the information element amount has been clicked, the collaterals window will be displayed. Detailed information about collaterals is provided in section 4 ‘Collaterals’.
When placing a new order, the user must enter or select the following data:
- Buy/Sell must be selected from the list. By default ‘Buy’ will be displayed to buyers and ‘sell’ will be displayed to sellers.
- Instrument is selected from the drop down menu. The instrument list approved by the Operator in the Conditions of Trade in Biomass Products. After selecting an instrument, the ETS will display an informational message with specification of the main quality and fraction parameters of the instrument.
- Delivery period must be selected from drop down menu. The periods for which transactions may be concluded according to the provisions of the Regulation are available. After selecting a delivery period, the ETS will display an informational message with specification of the delivery start and duration in weeks.
- Trading location must be selected from the drop down menu; it is a location from/to which trading will take place. If the right to implement in a trading location, trade according to non-standard conditions has been granted, the non-standard conditions will be specified automatically. The buyer may untick the non-standard conditions, if they are not mandatory. After the tick has been removed, the order will be forwarded to standard trade.
- Transport type (the element is only displayed for orders in which delivery in the selected trading location may also take place by railway transport). When placing an order to buy, the buyer may additionally specify whether it will accept fuel delivered by railway. When an order to sell is placed, this element remains inactive and the delivery type ‘railway delivery’ is specified automatically, according to the settings for the respective trading location.
- Order amount, toe/week. The amount of fuel to be purchased or sold per week must be entered. The information must be entered using integer numbers. The total order amount should be specified for biomass reserve products.
The following indivisible order amount multiples shall apply to woodchip products:- 6 toe – when the amount purchased is smaller than 60 toe per week;
- 30 toe – when the amount purchased is at least 60 toe per week.
The following indivisible order amount multiples shall apply to wood pellet products:
- 1 toe – when the amount purchased is smaller than 30 toe per week;
- 10 toe – when the amount purchased is at least 30 toe per week.
In case reserve delivery period was selected, the total order amount must be entered.
- Lot must be selected from the drop down menu (not available for reserve delivery period products).
The possible values are 30, 90, 180 toe and ‘Same as order (only when <60 toe/week).’ The options available to buyers are limited depending on the installed capacity of heat production or electricity generation, while the options available to sellers are not limited. By default, the value ‘Same as order (only when <60 toe/week)’ will be displayed to all users.
In case of railway delivery, the minimum transaction amount equals to the order amount. - Total order amount, toe. The total order amount is calculated as the product of the entered order amount per week and the number of weeks of the selected delivery period.
For reserve delivery period products the total order amount are not multiplied by number of weeks. - Order price, EUR/toe. Buyers must enter the maximum fuel purchase price and sellers must enter the minimum fuel selling price. The information must be entered to the precision of one euro.
- Transportation tariff, EUR per 1 toe per kilometre (the element is only displayed for orders to sell). The tariff per kilometre per toe must be entered. The information must be entered to the precision of one eurocent. If delivery from the trading location will take place by railway, transportation tariff consist of the following two components: the tariff of delivery to the required railway station and the tariff of transportation by railway.
The maximum transportation distance, km (the element is only displayed for orders to sell). The maximum fuel transportation distance, specified in section 5.1 ‘Account settings’, will be displayed. - Value, EUR. The value of an order to buy is calculated as the product of the total order amount specified in the order and of the price. The value of an order to sell is calculated as the product of the total order amount specified in the order and of the price plus the maximum fuel transportation cost, i.e. the product of the maximum transportation distance and of the transportation tariff. Transportation costs are rounded to the precision of one euro to the greater figure as follows: if the number of cents of the calculated transportation costs is greater than 0 (zero), then 1 (one) must be added to the transportation costs expressed in euros and the number of cents is equalled to 0 (zero).
- Valid till. The date of the auction until which the order will be valid must be selected from the drop down menu. All dates of the action, on which the selected instruments will be traded, will be displayed. After an auction takes place and if the date of validity of an order has already expired, this order will be automatically withdrawn from the Exchange.
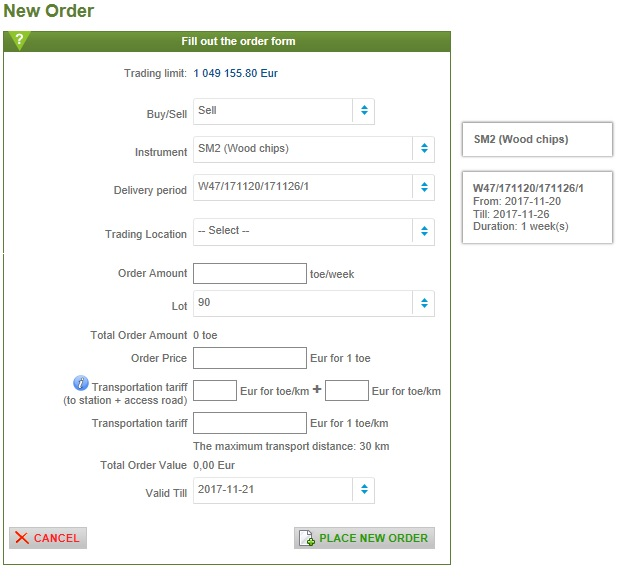
Figure 22. Window for entering data of an order to sell

Figure 23. Window for entering data of an order to buy
The user may cancel the order by clicking [CANCEL] at any time during the order placement process. The trading window will be displayed (Figure 21).
After entering order data, the order will be forwarded to the Exchange by clicking the [PLACE NEW ORDER]. The ETS will display, in the heading area, an informational message about the status of the order and then display the order signing window.
![]()
Figure 24. Informational message
2.2.1. Order placement errors
If the user has entered incorrect data or has not selected an element in the order being placed, the ETS will display the following error messages:
- if an order type, instrument, delivery period, trading location or valid till is/are not selected next to the selected element, an informational message will be displayed (Figure 25).

Figure 25. Informational message
- if an order amount is not entered, next to the element an informational message will be displayed (Figure 26).

Figure 26. Informational message
- if an order amount is specified not as a multiple of indivisible order amount, next to the element an informational message will be displayed (Figure 27).

Figure 27. Informational message
- if an order amount entered exceeds or equals 60 toe and the lot is selected ‘Same as order (only when <60 toe/week),’ an informational message will be displayed next to the element (Figure 28).

Figure 28. Informational message
- if an order price or transportation tariff is not entered, next to the element an informational message will be displayed (Figure 29).

Figure 29. Informational message
- if, prior an order is placed, no maximum transportation distance is set in the section 1 ‘Account settings’, the following informational message will be displayed in the ETS heading (Figure 30).
![]()
Figure 30. Informational message
- if, when a new order is paced, the balance of collaterals is insufficient, an informational message will be displayed in the ETS heading (Figure 31). In this case, the order will not be saved in the ETS. To place the order, the user must either reduce the value of the order to the amount specified in the ‘Trading limit’ or provide additional collaterals.
![]()
Figure 31. Informational message
- if the user places an order after the time period for placing orders has expired, the ETS will display the respective informational messages (Figure 32 – Figure 34). Such an order will not be saved in the ETS. To place the order, the user must do this during the time period for placing orders, i.e. from 8:00 a.m. of the third business day of each calendar week until 10:30 a.m. (for orders to buy) and 11:00 a.m. (for orders to sell) of the second business day of the succeeding calendar week.
![]()
Figure 32. Informational message
![]()
Figure 33. Informational message

Figure 34. Informational message
After the order information has been adjusted according to the respective informational message, [PLACE ORDER] must be clicked once again.
2.2.2. Signing of orders
After [PLACE ORDER] has been clicked, the order will be saved in the ETS. The status of such an order in the / Orders/ is specified as ‘Not signed’ (Figure 49). Orders with the ‘Not signed’ status are not in the trade and do not take part in the conclusion of transactions. To place an order in the trade, the order must be signed. An order can be signed after entering the order data or by selecting /Orders/ in the menu and clicking the icon [![]() ] in the displayed orders list (Figure 49). In both cases, the user will be transfered to the order signing window (Figure 35).
] in the displayed orders list (Figure 49). In both cases, the user will be transfered to the order signing window (Figure 35).
Prior to signing an order, the user must check the order details and confirm that he has familiarised himself and accepts the conditions for placing orders (the condition must be ticked). If the information is correct, the user must click [SIGN ORDER]. To adjust the order data, the user must click [CHANGE ORDER]; to cancel the order, the user must click [CANCEL ORDER].
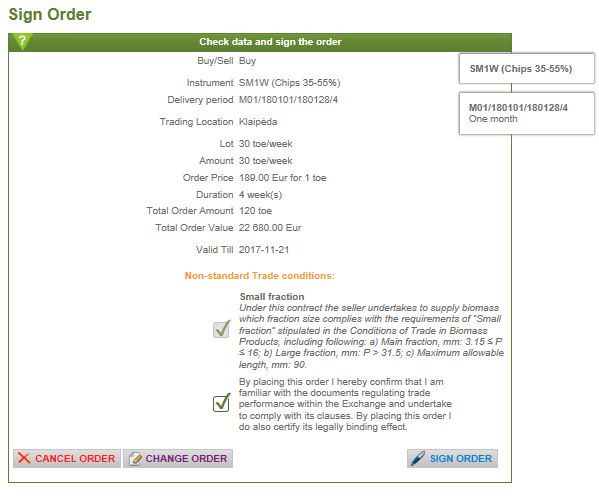
Figure 35. Order signing window
After [SIGN ORDER] has been clicked, the order will be forwarded to the trade and participate in the conclusion of transactions. The status of such an order in the list of orders will be specified as ‘Active’ (Figure 49).
If the user attempts to place an order but fails to tick his consent to the condition for placing order, the order will not be forwarded to the trade and next to the non-ticked element an informational message will be displayed (Figure 36).
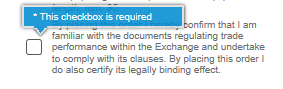
Figure 36. Informational message
After the missing element has been marked, [SIGN ORDER] must be clicked once again.
After the order is signed, the informational message about the status of the order will be displayed in the ETS heading and the order will be moved to the trading window (Figure 21).
![]()
Figure 37. Informational message
On the auction day, buyers can place orders to buy in the Exchange by the end of the buy order placement stage, while orders to sell can be placed by the end of the sell orders placement stage. If the user attempts to sign an entered yet unsigned order later, the ETS signing icon will be inactive and a short informational message will be displayed: for orders to buy – (Figure 38), for orders to sell (Figure 39).

Figure 38. Signing of an order to buy
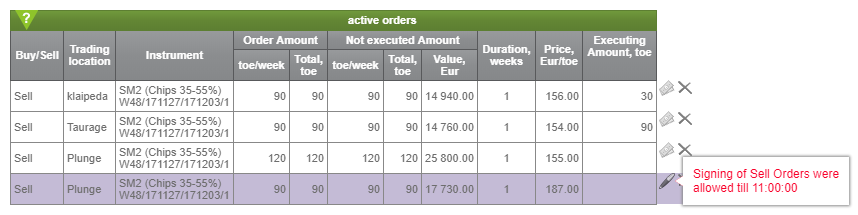
Figure 39. Signing of an order to sell
2.2.3. Adjustment of order details
Order data may be adjusted before the moment they are forwarded to the trade; later, orders can only be withdrawn from the trade.
The adjustment of the data of an order entered in the ETS is possible by clicking [CHANGE ORDER] in the order signing window (Figure 35). The order’s data entry window will be displayed (Figure 22 or Figure 23), in which the required data of the order can be adjusted. To place adjusted order to the Exchange, click [PLACE NEW ORDER].
After the data have been saved, the order signing window will be displayed (Figure 35). Read more on the signing of orders in section 2.2.2 ‘Signing of orders’.
2.2.4. Cancellation of orders
An order that has been entered in the ETS or placed in the Exchange but still unexecuted may be withdrawn from the ETS or, respectively, from the Exchange. There are several ways to cancel an order:
- By clicking [CANCEL ORDER] before signing the order in the order signing window (Figure 35);
- By clicking the icon []next to the respective order in the ‘Active orders’ table of the trading window (Figure 19);
- By clicking the icon [
 ] next to the respective order in Orders list (Figure 49) opened in /Orders/.
In all cases the ETS will display an informational message (Figure 40) asking for confirmation of order cancellation.

Figure 40. Confirmation of order cancellation
To cancel an order click [YES], to reject order cancellation, click [NO].
If the user ticks the ‘Cancel and make new order’ element in the message (Figure 40), the ETS will display a new order template based on the data of the cancelled order (Figure 22 or Figure 23).
After an order has been canceled, an informational message about order cancellation will be displayed in the ETS heading (Figure 41). A canceled order cannot take part in the conclusion of transactions. The status of a canceled order in the list of Orders (Figure 49) will be specified as ‘Canceled’.
![]()
Figure 41. Informational message about order cancellation
If the user attempts to cancel an order after the auction has started, the order cancellation icon will be inactive and the ETS will display a short informational message (Figure 42)./>
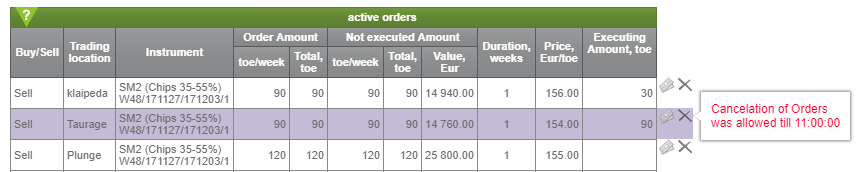
Figure 42. Order cancellation
2.2.5. Adjustment of order prices
By clicking the price adjustment icon [![]() ] next to the required order in the ‘Active orders’ table of the trading window (Figure 43) or in any part of the order row, the price of the order can be adjusted without modifying any other data of the order.
] next to the required order in the ‘Active orders’ table of the trading window (Figure 43) or in any part of the order row, the price of the order can be adjusted without modifying any other data of the order.
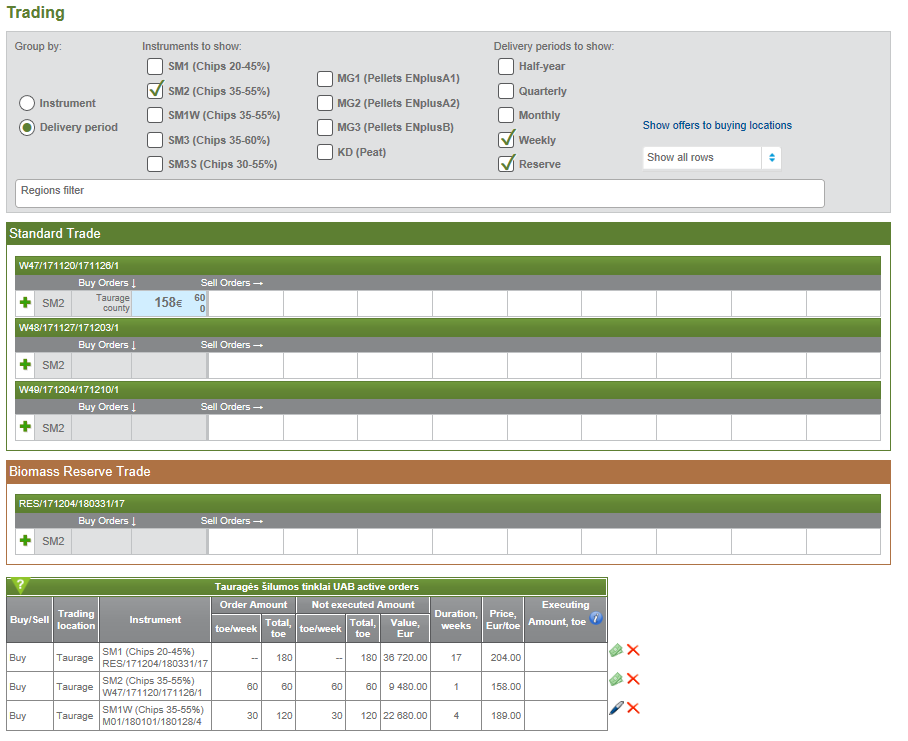
Figure 43. Trading window
The order’s price adjustment window will be displayed (Figure 44) or (Figure 45). All the data about the order being adjusted will be displayed in the window. The user can change the price to the precision of one euro.
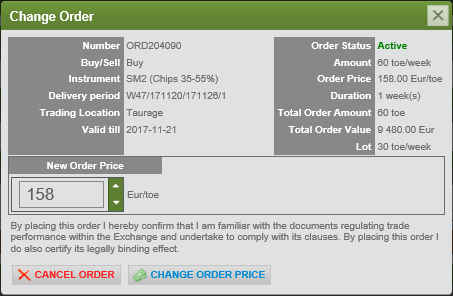
Figure 44. Buy order’s price adjustment window
In the sell order’s price adjustment window (Figure 45), the sell order’s price is recalculated based on the entered ‘New order price’ and costs of transportation to the trading locations for all buy orders to which the sell order is assigned.
A highlighted ‘Offered price’ means that the decision to adjust the price for that order to buy has been taken, but the respective order to sell is assigned to several orders to buy, for which reason, if a new price is entered, the price will be adjusted for all the respective orders to buy.
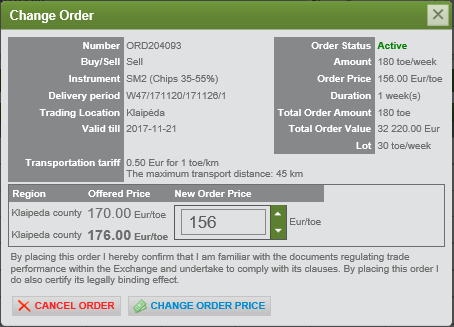
Figure 45. Sell order’s price adjustment window
Having entered the new order price, the user must click [CHANGE ORDER PRICE]. The ETS will display an informational message (Figure 46) and open the trading window (Figure 43).
![]()
Figure 46. Informational message
During the auction stage, sellers may only reduce the prices of their orders; consequently, if they attempt to raise the prices by clicking [CHANGE ORDER PRICE], the ETS will display an informational message specifying that the price may not exceed the price of the respective earlier order (Figure 47).
Furthermore, at this stage, sellers may not cancel their orders; consequently, the option [CANCEL ORDER] in the sell order’s price adjustment window will be inactive (Figure 47).
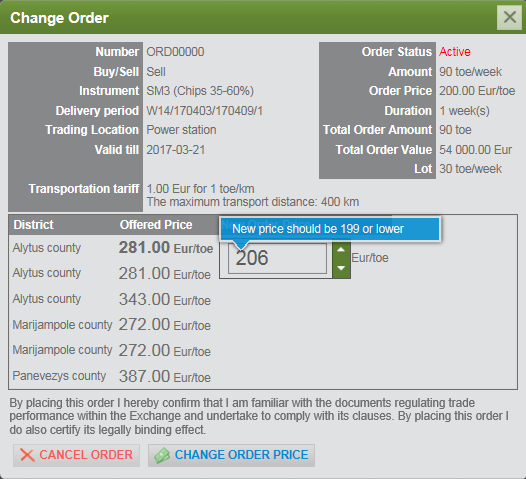
Figure 47. Sell order’s price adjustment window
If a buyer attempts to change the price after the period for placing orders to buy has expired, only the cancellation button will be active in the table and the price change button will be inactive (Figure 48).
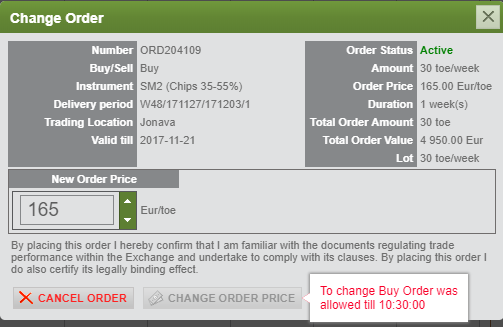
Figure 48. Buy order’s price adjustment window
2.3. Orders
After the /Orders/ menu has been clicked, the ETS will display the window with all the orders placed by the user (Figure 49).
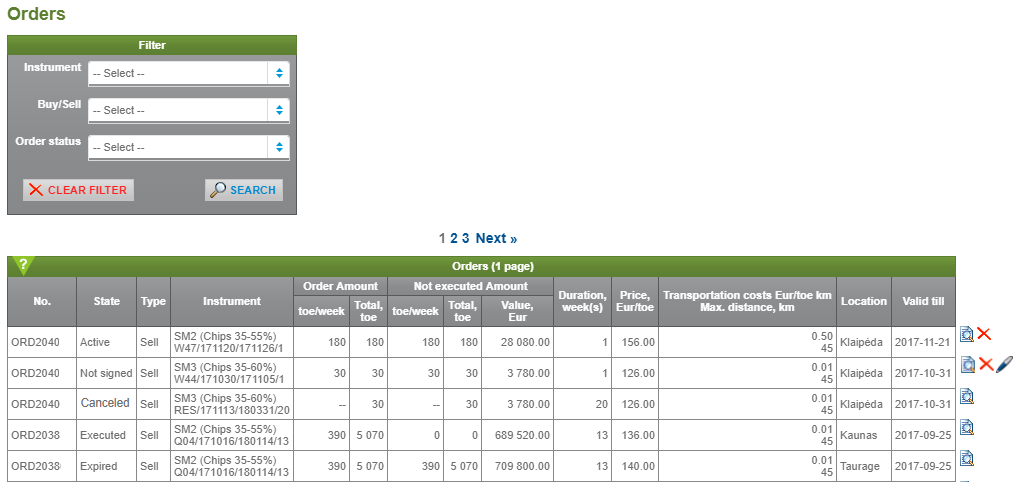
Figure 49. Orders window
The possibility to filter orders is provided in the Orders window. To view orders of interest to him only, the user must select the required filter in the filtering element (Figure 50).
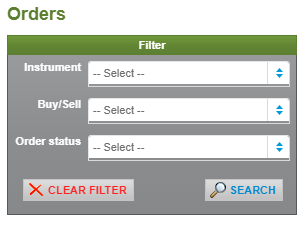
Figure 50. Filtering element
After a filter has been selected and [SEARCH] clicked, the ETS will select orders satisfying the selection criteria and display them in the ‘Orders’ table (Figure 51).

Figure 51. Order table
Meanings of elements of the ‘Orders’ table:
- No. – the unique number of the placed order in the ETS.
- State – the status of the placed order; read more in section 3.1 ‘Order state’.
- Type – an order to buy or to sell.
- Instrument – an object of trade: fuel type and delivery period.
- Order Amount
- toe/week – the weekly amount of an order. Not specified for biomass reserve products.
- Total, toe – fuel amount of an order per all delivery period.
- Not executed Amount – the order amount that was not executed at earlier auctions.
- toe/week – not executed weekly amount of an order. Not specified for biomass reserve products.
- Total, toe – not executed total amount of an order;
- Value, Eur – the value of not executed order.
- Duration, weeks – the number of weeks of a delivery period.
- Price, EUR/toe – fuel price per 1 toe. For orders to sell: the minimum selling price; for orders to buy: the maximum purchase price including delivery cost to the buying location.
- Value, EUR – the value of the order, which is calculated as the product of ‘Amount, toe/week’, ‘Duration, weeks’ and ‘Price, EUR/toe.
- Transportation costs, EUR/toe km. Max distance, km. These details are only provided for orders to sell. The transportation costs are specified at the time the order was entered and the maximum transportation costs specified in the section 1 ‘Account settings’.
- Location – from/to which trading location(s) sale (purchase) takes place. This parameter shows the location from (in case of sale) or to (in case of purchase) which fuel must be delivered.
- Valid till – the date until which the order is valid. This parameter shows the last day of the auction in which the order will take part. After the respective last auction day, the order is automatically withdrawn from the Exchange and its status is marked as ‘Expired’ or ‘Executed’ if a transaction is concluded based on the order.
Users can perform the following steps in the Orders window:
- By clicking the icon [
 ], view the data of a placed order (Figure 52). All data of the order, price adjustments, and information of the concluded transactions are specified here, if the status of the order is ‘Executed’;
 - By clicking the icon [], withdraw a selected order from the Exchange, provided that the status of the order is either ‘Active’ or ‘Not signed’;
- By clicking the icon [
 ], sign an entered order that has not been signed earlier;
 - By clicking the icon [], adjust the price of a active order without changing any other data of the order.

Figure 52. Order data window
2.3.1. Order state
The ETS will assign certain states to all orders. Order state is specified in the ‘Orders’ table of the Orders window (Figure 49). Possible order states:
- Not signed – the order has been entered but has not been signed. Such an order will not take part in the conclusion of transactions.
- Active – an entered and signed order. Orders with this state take part in the auction.
- Canceled – the order has been canceled and no longer takes part in the conclusion of transactions.
- Expired – the term of validity of the order has expired.
- Executed – a transaction(s) was (were) concluded based on the order.
The status of an entered yet unsigned order is marked as ‘Not signed’; after the order is signed, its state is changed to ‘Active’. The user can only cancel orders with the states ‘Not signed’ or ‘Active’. After an order has been canceled, it acquires the ‘Canceled’ state.
After a transaction has been concluded in the Exchange, the state of the respective order is changed to ‘Executed.’ After the term of validity of an order after the auction has expired, the state of the order is changed to ‘Expired’. If an order is executed only partially, the remaining unexecuted amount of the order is marked as ‘Active’.
The process of change of order states is shown below (Figure 53):
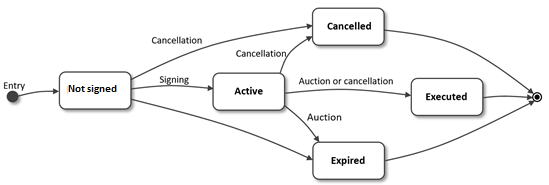
Figure 53. The process of changing of order states
2.4. Collateral account
The required amounts of collaterals and the conditions for presenting collaterals are specified in the Regulation.
When the user places an order, the ETS reserves 5% or 15% (for category B, C and D participants that place orders for the purchase and/or sale for one-week delivery periods) of the value of the order. In case of sale, the maximum transportation costs are added to the value of the order. If the balance of collaterals is insufficient, the order will not be saved in the ETS.
If transactions for delivery periods longer than one calendar week are concluded, the ETS for participants of reliability categories B, C and D will reserve additional collaterals for such a value as to ensure that the total value of collaterals allocated to that specific order equals to 10% of the value of the concluded transaction.
In the Exchange collaterals are reserved for the orders with the state ‘Active’ and for concluded transactions with the states ‘Waiting for confirmation’ or ‘Active.’
Information of the provided and/or reserved collaterals can be viewed under submenu /Collateral Account/ (Figure 54).

Figure 54. Collateral account window
The ‘Trading limits for sells’ table is presented for sellers of reliability category C and D. According to the Conditions of Trade in Biomass Products, the value of transactions that may be concluded by these sellers is limited as follows:
- for sellers of reliability category C, the maximum value of transactions and placed orders may not exceed their own capital more than 10 times;
- for sellers of reliability category D, this value may not exceed their own capital more than 5 times.
Elements of the ‘Trading limits for sells’ table (Figure 54):
- Limit, EUR – maximum allowable value of orders that may be placed and/or of transactions that may be concluded.
- Reserved limit, EUR – the sum of the values of all placed orders and concluded transactions (the value of undelivered amount is taken into account).
- Unused limit, EUR – the difference between ‘Limit, EUR’ and ‘Reserved limit, EUR.’
The ‘Deposited bank warranties for biomass trading’ and ‘Deposited funds for biomass trading’ tables contain information on the warranties presented by the user to the Operator.
Elements of the ‘Deposited bank warranties for biomass trading’ table (Figure 54):
- Bank – name of the bank that issued the warranty.
- Number – bank warranty number.
- Valid from – start date of validity of the bank warranty.
- Valid till – end date of validity of the bank warranty.
- Value, EUR – value of the deposited bank warranty.
- Reserved value, EUR – value of deposited warranties used for ‘Active’ transactions and/or orders.
- Balance, EUR – value of unused bank warranty calculated as the difference between ‘Value, EUR’ and ‘Reserved value, EUR.’
Elements of the ‘Deposited funds for biomass trading’ table (Figure 54):
- Balance date – date on which funds balance was updated for the last time.
- Value, EUR – value of the deposited funds.
- Reserved value, EUR – value of deposited funds used for ‘Active’ transactions and/or orders.
- Balance, EUR – the value of unused funds calculated as the difference between ‘Value, EUR’ and ‘Reserved value, EUR.’
The ‘Collateral account for biomass trading’ table contains information on the warranties deposited by the user and reserved for its placed orders and/or concluded transactions. Elements of the table (Figure 54):
- Operation, number – ‘Order’ – the collateral is reserved for the placed order, unique order number. ‘Transaction’ – the collateral is reserved for the implementation of the transaction, unique transaction number in the ETS.
- Counterparty – name of the legal entity or given name and surname of the natural person that is the other party to the concluded transaction and name of the trading location.
- Instrument – trading object of the order or transaction: fuel type and delivery period. After the instrument name has been clicked, the trading window (Figure 43) for that product will be displayed. If the link is inactive, it means that trade in this instrument has ended and no trading window will be displayed for this instrument.
- Price, EUR/toe – price per 1 toe of the placed order or concluded transaction.
- Total amount, toe – total amount of the placed order or concluded transaction. For sellers, the already delivered amount of fuel, i.e. the amount of fuel actually delivered according to ‘Fuel amount and quality reports’, is specified in brackets in green.
- Value, EUR – value of the placed order or concluded transaction. To sellers, which have arranged the ‘Fuel amount and quality reports’ for some of the delivered fuel, the value of the fuel that remains undelivered will be specified.
- Maximum transportation costs, EUR – maximum transportation costs of the order to sell. The costs are calculated as the product of the maximum distance set by the seller, transportation tarrif, weekly amount, and number of delivery weeks. The values of multipliers are shown when the cursor is placed on this element.
- Required margin – margin of collaterals specified in the Regulation.
- Collateral Bank warranty, EUR – amount of collateral used under this transaction or order from the amount of the deposited bank warranty. For sellers, this amount is adjusted after the respective ‘Fuel amount and quality reports’ have been agreed on. For buyer transactions, this amount is released after the transaction closing procedure has been agreed on. Read more in section 1.2 ‘Initiation of the transaction closing procedure’.
- Collateral Funds, EUR – amount of collateral used under this transaction or order from the amount of the deposited funds. For sellers, this amount is adjusted after the respective ‘Fuel amount and quality reports’ have been agreed on. For buyer transactions, this amount is released after the transaction closing procedure has been agreed on. Read more in section 1.2 ‘Initiation of the transaction closing procedure’.
- Reserved till – the date by which collateral for the specific order or transaction has been reserved is specified. The date is determined by adding 60 calendar days to the delivery period’s end date of the placed order or concluded transaction.
- Delivered and reported amount – fuel amount agreed on via the ETS according to the information contained in the respective ‘Fuel amount and quality report’. When the cursor is placed on the cell, an informational message with links to the respective ‘Fuel amount and quality reports’ will be displayed. Read more in section 3.1 ‘Entry of quality report information’.
- [
 ] – by clicking the icon, ‘Arrange fuel quality’ or ‘Initiate transaction closing’ for Buyers and ‘Confirm transaction closing’ for Sellers can be selected.
2.4.1. Refund of collaterals
Users who want to have the deposited collaterals refunded, may apply to the Operator via the ETS. For applying click [REQUEST WARRANTY REFUND] in the collaterals window (Figure 54).
A message about the refund of collaterals will be displayed (Figure 55). In the message, the company details will be filled in automatically, and collaterals will only be refunded to the bank account specified in the ‘Energy Exchange Participant Agreement’. The user can enter the amount of collaterals that the user wants to have refunded. Prior to submitting the application, the user must confirm that it has familiarised itself with the conditions for submitting applications. The application can be submitted by clicking [SIGN AND SEND]; to reject the submission, [CANCEL] must be clicked.

Figure 55. Collateral refund message
On receipt of the respective application, the Operator will consider it and refund the collaterals according to the conditions and deadlines set in the Regulation.
3. AUCTION
Auctions take place via the ETS on the auction days announced in the Trading calendar – usually on the second business day of a calendar week.
On the auction day, the ETS presents the auction process timeline (Figure 56). The timeline has certain intervals according to the steps that users can take.

Figure 56. Auction process timeline
An auction consists of the following stages:
- 10:30 a.m.: end of the stage for placing orders to buy.
- From 10:30 a.m. to 11:00 a.m., orders to sell may still be placed. During this stage, sellers may adjust and/or cancel their current orders to sell and place new orders. Buyers may not place any new orders or adjust their current orders during this stage but may cancel orders that they placed earlier.
- The auction stage.
- 12:00 p.m.: announcement of preliminary trading results.
The auction stage starts at 11:00 a.m. and lasts for 3 (three) minutes. During this stage, members may not cancel their current orders and/or place any new ones, but sellers may reduce the selling prices of their placed orders for an unlimited number of times. If reduced price of an order to sell affects preliminary trading results (members concluding transactions or transaction price and/or amount change), the auction stage for that specific instrument is extended for a new period of 3 (three) minutes from the moment the reduced price is entered. The auction stage can be extended for an unlimited number of times, but not longer than until 12:00 p.m.
During auctions, the ETS will display the time remaining until the end of the auction for each individual instrument. If an auction is extended according to the conditions described above, the ETS will extend the auction for that specific instrument for a new period of 3 (three) minutes and restart the timer (Figure 57).

Figure 57. Quotations table during an auction
When an auction is extended, an auction extension message (Figure 58) will be displayed in the ETS heading with specification of the instrument for which the auction was extended and of the time until which the auction has been extended.

Figure 58. Auction extension message
When fewer than 3 minutes remain before the end of the auction but the conditions necessary for extending the action change, the auction time will not be extended for a new 3-minute period and the auction will end at 12:00 p.m. In this case, the auction extension message (Figure 59) displayed in the ETS heading will specify the auction closing time, i.e. 12:00:00 p.m.
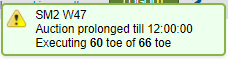
Figure 59. Auction extension message
Final trading results are announced according to the timetable of announcement of trading results set in Conditions of Trade in Biomass Products.
3.1. Principles of contract conclusion and pricing
During the auction, contracts are finalised based on placed orders to buy and to sell. Contracts are only finalised if the following conditions are satisfied:
- The same product is being purchased and sold, i.e. the fuel type and the delivery period match.
- The delivery type (i.e. delivery in big bags to be unloaded by the buyer) available in the buyer’s location is acceptable to the seller, i.e. coincides with the type specified at the time the respective order was placed.
- The non-standard trading conditions of the buyer’s location are acceptable to the seller, i.e. the seller, when placing the respective order, has agreed to the delivery of fuel according to the specified non-standard conditions.
- The maximum transportation distance specified by the seller is smaller than, or equal to the distance to the buyer’s site.
- The price of the order to sell is smaller than, or equal to the price of the order to buy.
- The contract is only finalised if the order quantity (or the remaining unexecuted share of the order) is greater than, or equal to the minimum order quantity specified in the respective order placed by the other party.
Orders to buy and to sell are paired with consideration to the maximum positive difference between the buyer’s price and the seller’s price. A contract is finalised based on the paired orders. If the quantities of grouped orders to buy and to sell do not match, the unsold or unpurchased balance of the order quantity remains in the trading system of the Exchange and participates in other contracts (until validity of the orders expires). In case the remaining order quantity is smaller than the set minimum order quantity, the unimplemented share of the order is automatically annulled. This contract finalisation cycle is repeated until orders satisfying conditions mandatory for contract finalisation are available in the market.
The prices of transactions being concluded are determined according to the buyer auction principle, i.e. one price, which is equal to the price of the last seller order executed against the specific buyer order, is set for transactions concluded based on the specific buyer order (Figure 60).

Figure 60. Procedure for setting a contract price
3.2. Preliminary contracts
When the trading session on an auction day is over, the ETS will display the respective message (Figure 61).

Figure 61. Informational message
After the user has clicked the link here in the informational message (Figure 61), the ETS will display the window (Figure 62) with all preliminary transactions concluded in the Exchange for all instruments.

Figure 62. Preliminary transactions
Transactions of the logged in user in the ‘Preliminary Transactions’ table will be highlighted in blue.
The instruments for which preliminary transactions have been concluded and the applicable non-standard conditions are specified above the ‘Preliminary transactions’ tables.
Elements of the ‘Preliminary contracts’ table :
- Buy orders – information of the order to buy based on which the preliminary transaction is concluded:
- District – the district in which the purchase takes place is specified.
- Amount, toe/week – the weekly amount of the placed order to buy.
- Price, EUR/toe – the price of the placed order to buy.
- Sell orders – information of the order to sell based on which the preliminary transaction is concluded:
- Amount, toe/week – the weekly amount of the placed order to sell.
- Price, EUR/toe – the price of the placed order to sell, with consideration to the actual costs of transportation to the specific buyer location.
- Transactions – details of the preliminary contract:
- Amount, toe/week – the weekly amount of the preliminary transaction.
- Duration, weeks – the duration of transaction delivery in weeks.
- Total amount, toe – total amount of the concluded contract. Calculated as the product of the ‘Amount, toe/week’ and ‘Duration, weeks’.
- Price, EUR/toe – the price of the preliminary transaction.
- Value, EUR – the value of the preliminary transaction, which is calculated as the product of ‘Total Amount, toe’ (Transaction), ‘Price, EUR/toe’ (Transaction).
4. TRANSACTIONS MANAGEMENT
4.1. Transactions
On expiry of the deadline for considering claims and before expiry of the deadline for announcing final results, the Operator executes the auction. On completion of the auction, the respective informational message (Figure 63) will be displayed in all windows of the informational area of the ETS.
![]()
Figure 63. Informational message
After the /Transaction/ submenu has been clicked in the /Transactions management/ menu of the ETS, information about all the transactions concluded by the participant will be displayed in My Transactions list (Figure 64).
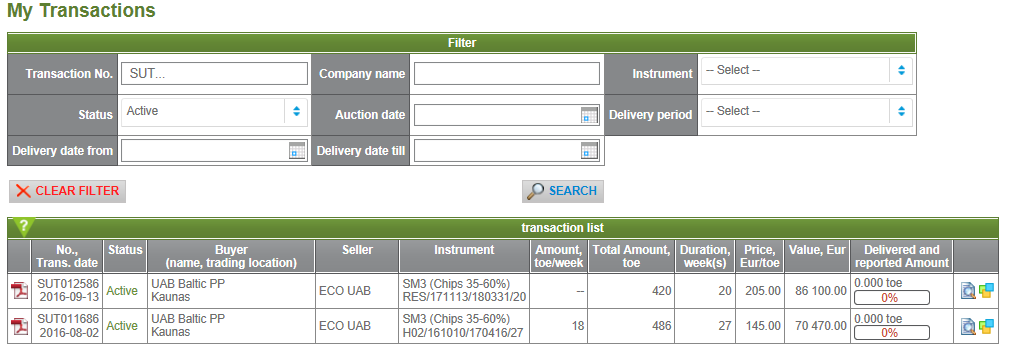
Figure 64. My Transactions list
Elements of the table ‘Transaction list’:
- Icon [
 ] – after the document icon has been clicked, an electronic version of the document will be sent.
 - No., transaction date – the unique transaction number in the ETS (coincides with the number of the respective ‘Contract of purchase and sale of fuel’) and the date of conclusion of the transaction.
- Status – the status of the transaction.
- Buyer (name, location) – the name of the legal entity (buyer) or given name and surname of the natural person (buyer) that concluded the transaction and the name of the trading location.
- Seller – the name of the legal entity (seller) or given name and surname of the natural person (seller) that concluded the transaction.
- Instrument – the instrument (fuel type and delivery period) for which the transaction was concluded.
- Amount, toe/week – the weekly amount of the concluded transaction. The weekly amount for biomass reserve products are not specified.
- Total Amount, toe – the total amount of the concluded transaction, which is calculated as the product of ‘Amount, toe/week’ and ‘Duration, week(s)’.
- Duration, week(s) – the duration of instrument delivery in weeks.
- Price, EUR/toe – price per 1 toe of the concluded transaction.
- Value, EUR – value of the concluded transaction, which is calculated as the product of ‘Total Amount, toe’ and ‘Price, EUR/toe’.
- Delivered and reported amount – the amount of fuel agreed on via the ETS, which is evaluated based on the information contained in the respective fuel amount and quality report.
- Icon [
 ] – the transaction information window (Figure 65) is displayed upon clicking the icon.
 - Icon [
 ] – the following options are available upon clicking the icon:
- For buyers: ‘Arrange fuel quality’ (read more in section 4.3.1 ’Entry of quality report information’) or ‘Initiate transaction closing’ (read more in section 4.1.2 ‘Initiation of the transaction closing procedure’).
- For sellers: ‘Confirm transaction closing’ (read more in section 4.1.3 ‘Confirmation of the transaction closing procedure’).

Figure 65. Transaction information window
4.1.1. Transaction statuses
Transactions that do not require additional collaterals receive the ‘Active’ status. All the other transactions concluded at the auction receive the ‘Waiting for confirmation’ status. After members have presented additional collaterals, the Operator will confirm that both parties to the respective transaction have fulfilled its obligations and that their transaction has received the ‘Active’ status. If members fail to present additional collaterals, the Operator will annul the effectiveness of the respective transaction and the transaction will receive the ‘Canceled’ status.
Fuel can only be delivered and payments can only be made under ‘Active’ transactions.
After the seller has delivered the fuel provided for in the respective contract and the buyer has paid for the fuel in full, the status of the transaction will be changed to ‘Executed’ on completion of the transaction closing procedure or on expiry of the 60-day term after the end of the delivery term provided for in the transaction.
If a party to a transaction presents claims concerning execution of the transaction, the Operator may extend the transaction closing period, with the transaction receiving the ‘Active (delayed closing)’ status.
Possible transaction statuses:
- Waiting for confirmation – the transaction has been concluded but has not become effective yet because additional collaterals had not been presented.
- Active – the transaction is effective and must be executed.
- Canceled – the transaction has not become effective because at least one party to the transaction had failed to present additional collaterals or both parties had decided to terminate the transaction.
- Waiting for seller/Closing in progress – the buyer had initiated the transaction closing procedure but the seller has not confirmed it yet.
- Executed – the seller has delivered fuel and the buyer has paid for it. The transaction has been executed.
- Active (delayed closing) – the transaction is deemed as unexecuted because claims were presented; the date of closing of the transaction has been delayed.
4.1.2. Initiation of the transaction closing procedure
Only the buyer that has paid for the delivered fuel in full may initiate the transaction closing procedure, if none of the parties to the transaction has any claims in connection with the transaction. On completion of the transaction closing procedure, the collaterals reserved under the transaction to the buyer will be automatically refunded after the parties to the transaction have confirmed transaction closing.
The buyer in the My transactions list window (Figure 66), must click the icon [![]() ] at the end of the row of the transaction that the buyer wishes to close.
] at the end of the row of the transaction that the buyer wishes to close.
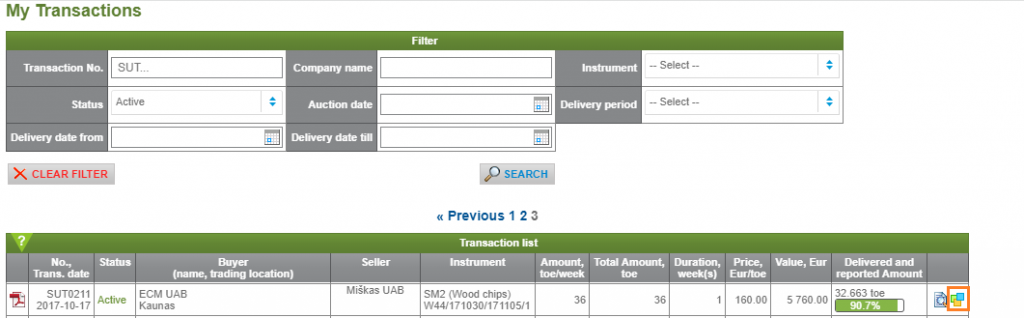
Figure 66. Transactions list window
The buyer must click [Initiate Transaction closing] in the displayed informational message (Figure 67).

Figure 67. Informational message
The ETS will display the ‘Confirmation of proper execution of fuel purchase and sale transaction’ window (Figure 68). The buyer must select ‘Sign’ and click [SIGN AND SEND].
After the buyer has sent the ‘Confirmation of proper execution of fuel purchase and sale transaction’ to the seller, the ETS will change the status of the transaction to ‘Active. Closing…’ (displayed to the seller) and ‘Active. Waiting for seller’ (displayed to the buyer).
The ETS will send a notification to the sellers e-mail about the initiation of transaction closing procedure by the buyer.

Figure 68. Confirmation message for buyer
4.1.3. Confirmation of the transaction closing procedure
The seller, if the buyer has fully paid for the fuel delivered under the respective transaction, can confirm transaction closing in the My transactions list window (Figure 69).
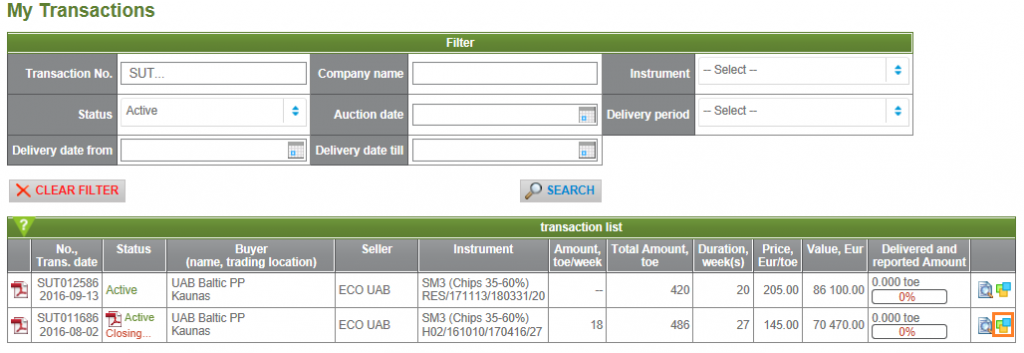
Figure 69. My Transactions list window
The status of a transaction, for which the buyer has initiated the closing procedure, will be displayed as ‘Active. Closing…’. The seller must click the icon [![]() ] on the right of the transaction data row and then click [Confirm Transaction closing] in the displayed message (Figure 70).
] on the right of the transaction data row and then click [Confirm Transaction closing] in the displayed message (Figure 70).
![]()
Figure 70. Informational message
The ‘Confirmation of proper execution of fuel purchase and sale transaction’ will be displayed to the seller (Figure 71). The seller must select the ‘Sign’ option and click [SIGN AND CLOSE] in the message.

Figure 71. Confirmation message for seller
After the seller has confirmed the transaction closing procedure, i.e. has signed and sent the ‘Conformation of proper execution of fuel purchase and sale transaction’ to the buyer, the ETS will change the status of the transaction to ‘Executed.’
The ETS will send notification to the buyer’s e-mail about confirmation of transaction closing and release the entire amount of collaterals that was reserved for the transaction.
NB. The transaction closing procedure has certain legal consequences. The seller must be aware that, after transaction closing has been confirmed, the Operator will release the amount of collaterals that was reserved for that transaction. Consequently, the seller will no longer be able to require, that the Operator uses the collaterals presented by the buyer, to compensate the seller for looses.
4.2. Delivery schedules
A standard delivery schedule will be set for transactions concluded in the Exchange, e.g. the seller must deliver the amount of fuel specified in the respective transaction in the specific delivery week on the business days chosen by the seller.
The buyer may, according to the applicable requirements of the Typical Conditions of Supply of Biomass, unilaterally adjust the standard fuel delivery schedule and must give the respective notification to the seller in writing or using the ETS tools. The parties may reach bilateral written agreement on a different delivery schedule acceptable to both parties to the transaction. The agreement on a delivery schedule made via the ETS and/or using electronic means of communication shall also qualify as a written agreement of the participants.
After the buyer and the seller have performed any steps that change the status of a fuel delivery schedule, the ETS will send the notification by e-mail to the other party about the changes to the delivery schedule and specification of the steps that must be performed.
The rules for the preparation of supply schedule set out in the Typical Conditions of Supply of Biomass, do not apply to the supply of biomass reserve products. During the delivery period, the seller must deliver the biomass reserve products on the dates specified by the buyer to the seller in writing (to the e-mail address indicated in the purchase and sale contract of biomass reserve). Accordingly, the participants will not be able to adjust biomass reserve products delivery schedules in the ETS.
4.2.1. Initiation of adjustment of delivery schedule
Adjustment of fuel delivery schedules may be initiated and adjusted fuel delivery schedules may be reviewed by selecting /Delivery Schedules/ in the menu section /Transactions management/. The list of fuel delivery schedules will be presented in the opened window (Figure 72).
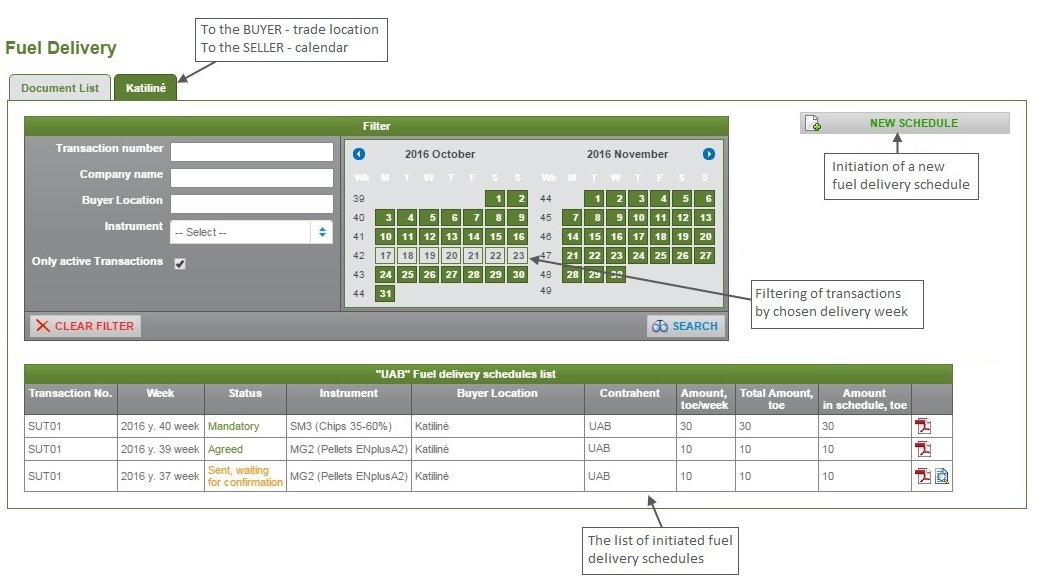
Figure 72. Fuel delivery schedule adjustment window
Users may select fuel delivery schedules using filters of interest.
- Transaction No. – if the full or a part of the transaction number is specified, the ETS will display all
delivery schedules formed for the specific transaction; - Company name – if a full or part name of company is specified, the ETS will display all delivery schedules formed for specified company;
- Buyer Location – if the full or part name of buyer location is specified, the ETS will display all fdelivery schedules formed for specified buyer’s site;
- Instrument – the ETS will display all delivery schedules formed for selected instrument.
The fdelivery schedules can be displayed for specified time periods, which can be selected in calendar. After a filter has been selected, click [SEARCH] and the ETS will display schedules satisfying the selected criteria in the ‘Fuel delivery schedules list’ table (Figure 72). All filtering parameters can be cancelled by clicking [CLEAR FILTER].
Elements of the table ’Fuel delivery schedules list’:
- Transaction No. – the transaction, for which the delivery schedule has been made.
- Week – the number of the delivery week.
- Status – the status of the delivery schedule. Read more in the section 4.2.4 ’Statuses of fuel delivery schedules’.
- Instrument – the type of fuel supplied under the transaction.
- Buyer location – the name and address of the buyer’s site.
- Contrahent – the other party of the transaction.
- Amount, toe/week – weekly amount according to transaction.
- Total Amount, toe – the total amount of transaction.
- Amount in schedule, toe – weekly amount adjusted in the schedule.
- Icon [] – clicking on the icon will download the ‘Notice on Adjusted Fuel Delivery Schedule’ in pdf format.
- Icon [] – clicking on the icon will open the window (Figure 80) the ‘Notice on Adjusted Fuel Delivery Schedule’ in the ETS.
The schedules for the buyers are grouped by trade locations in seperate tabs. They can be reviewed by clicking on a specific trade location’s tab. Delivery schedules of a current month will be displayed in the opened window (Figure 73).

Figure 73. Delivery schedules of the trade location
All delivery schedules are marked. Marking meanings have been presented in the Table 3.
Table 3
Marking of Fuel Delivery Schedules
|
Marking |
Description |
| |
Adjusted delivery schedules of all fuel types are marked with green colour. |
| |
Adjusted fuel delivery schedules ‘By days’, when a specified amount of fuel is supplied in specified days and/or hours, are marked with red colour. |
| |
The fuel delivery schedule, which was not submitted for adjustment/ or was rejected, is marked with grey colour. |
| |
The fuel delivery schedules submitted for adjustment are marked with green colour in grey stripes. |
| |
The fuel delivery schedules ‘By days’ with hourly delivery submitted for adjustment are marked with red colour in grey stripes. |
The information in the delivery schedule line shows the delivery time, amount, fuel type and the seller.
4.2.2. Entering of a Fuel Delivery Schedule for Buyers
Only the Buyer may initiate the adjustment of the fuel delivery schedule. To start the adjustment of the fuel delivery schedule, the Buyer shall select /Delivery Schedules/ in the menu section /Transactions management/, and then click [NEW SCHEDULE] in the opened window (Figure 74).

Figure 74. Making a new delivery schedule
The fuel delivery schedule adjustment wizard will be opened for the buyer (Figure 75).

Figure 75. The fuel delivery schedule wizard. Step 1
The buyer shall choose here the trade location, for which it will adjust the delivery schedule. The chosen trade location is marked with blue colour, and the Step 2 of the wizard is opened (Figure 76).

Figure 76. The fuel delivery schedule wizard. Step 2
In the Step 2, the buyer shall select the delivery week, for which the delivery schedule will be adjusted. The week is selected with a computer mouse and marked with grey colour.
When the delivery week has been selected, the buyer is transferred to the Step 3 (Figure 77).

Figure 77. The fuel delivery schedule wizard. Step 3
In the opened window all concluded transactions are seen, according to which fuel shall be supplied in the selected week.
In the column ‘Transaction’ relevant information about the transaction is provided, as well as the amount of fuel delivered according to fuel quality reports and the remaining amount to be delivered under this transaction.
In the column ‘Schedule type’ the buyer shall select the type of delivery schedule to adjust. Possible types:
- Anytime – according to this schedule, the seller is offered to deliver fuel on the day and at the time selected by him. The amount of delivered fuel is filled in the schedule automatically. The fuel delivery schedule of this type is mandatory to the seller without its separate approval.
- Anytime gradually – according to this delivery schedule, the seller must deliver fuel evenly on each work day. In the schedule, the weekly fuel amount will be distributed over all delivery days (e.g. 12 toe per day). The schedule of this type is mandatory to the seller without its separate approval.
- By days. According to this delivery schedule, the buyer shall specify the amount of the fuel to be delivered on the specific weekday and the delivery time interval. The schedule of this type shall be adjusted with the seller. The delivery time interval shall be set by marking the selection ‘Agreed time’ in the delivery schedule and clicking [Hours] (Figure 77).
- Additional conditions. The buyer may specify additional conditions for delivery. When additional conditions are specified, the seller’s approval is always required.
In the delivery time adjustment element, the seller may specify several time intervals, when would like to receive the fuel. The time intervals are set by pushing the interval start and end marks one way or another (Figure 78). When the delivery time has been set, the buyer must click [SAVE].

Figure 78. Delivery time adjustment element
In the cases specified in the ‘Typical Conditions of Supply of Biomass’, the buyer shall be entitled to adjust unilaterally the amount of delivered fuel.
If a gradual delivery schedule has been set, such delivery schedule shall be mandatory to the seller. If the buyer changes the delivery schedule according to individual needs, such schedule shall be approved by the seller.
Upon selecting the delivery schedule type, the buyer can see information, whether the delivery schedule offered by the buyer is mandatory to the seller, or whether its approval is required (Figure 77).
Having entered all delivery schedule data, the buyer shall click [SAVE] (Figure 77). Having saved the entered fuel delivery schedule, the buyer shall sign it and send to the seller by clicking the button [REWIEV AND SEND] (Figure 79).

Figure 79. Adjustment of the delivery schedule
When the seller clicks [REWIEV AND SEND] a formed ‘Notice about Agreed-on Fuel Supply Schedule’ (Figure 80) will be opened to the buyer. Upon clicking [REWIEV AND SEND], the status ‘Mandatory’ or ‘Sent, waiting for confirmation’ will be assigned to the schedule. The notification of the initiated adjustment of the delivery schedule will be send to the seller by e-mail.

Figure 80. Notice about Agreed-on Fuel Delivery Schedule
The buyer may cancel to send the fuel delivery schedule, if the seller has not approved it yet, by clicking the [CANCEL SENDING] in the ‘Notice about Agreed-on Fuel Supply Schedule’.
If the seller rejects the fuel delivery schedule proposed by the buyer, the buyer shall initiate the adjustment of the schedule again.
4.2.3. Adjustment of the Fuel Delivery Schedules (for the Sellers)
The seller can see the fuel delivery schedules submitted for adjustment by clicking the menu /Delivery Schedules/. The delivery schedule window will be opened for the seller (Figure 81).

Figure 81. Adjustment of fuel delivery schedules to the seller
In the cases, when the seller’s approval is necessary for adjustment of the fuel delivery schedule, the seller shall open the document by clicking the icon [![]() ] (Figure 81). In the opened ‘Notice about Agreed-on Fuel Supply Schedule’ (Figure 82) the seller shall select:
] (Figure 81). In the opened ‘Notice about Agreed-on Fuel Supply Schedule’ (Figure 82) the seller shall select:
-
- If the seller agrees with the schedule proposed by the buyer – click the button [CONFIRM AND SIGN].
- If the seller disagrees with the schedule proposed by the buyer – click the button [REJECT] and indicate the reasons for rejection.

Figure 82. Notice about Agreed-on Fuel Delivery Schedule
To approve the fuel delivery schedule, it is necessary to mark the field ‘CONFIRMED’ and click [YES] (Figure 83). The ETS will send to the buyer the notification about approval of the delivery schedule by e-mail. Such delivery schedule receives the status ‘Agreed’.

Figure 83. Delivery schedule approval message
To reject the proposed fuel delivery schedule, it is necessary to specify the reason of rejecting (Figure 84). Upon rejection, such schedule receives the status ‘Rejected, waiting for buyer’.

Figure 84. Delivery schedule rejection message
4.2.4. Statuses of fuel delivery schedules
The status of the fuel delivery schedule changes, when the participants make adjustment actions in the ETS.
Table 4
Statuses of Fuel Delivery Schedules
|
Status |
Participants who can see the status |
Description |
|
Saved |
Buyer |
Until the fuel delivery schedule proposed by the buyer has not been sent to the seller, the visible status of the schedule is ‘Saved’. |
|
Mandatory |
Buyer and seller |
When the buyer approves unilaterally the fuel delivery schedule, the visible status is ‘Mandatory’. |
|
Sent, waiting for confirmation |
Buyer |
Until the seller has not approved or rejected the fuel delivery schedule sent by the buyer to the seller the visible status of the schedule to the buyer is ‘Sent, waiting for confirmation’. |
|
Conformation required |
Seller |
When the buyer initiates adjustment of the fuel delivery schedule, where the seller’s approval is necessary for its validity, the visible status is ‘Confirmation required’. |
|
Rejected by the seller |
Buyer |
When the seller rejects the fuel delivery schedule submitted by the buyer, the visible status of the schedule is ‘Rejected by the seller’. If the buyer wants to initiate a new adjustment of the rejected fuel delivery schedule, he shall change at least one criterion specified in the delivery schedule. |
|
Rejected, waiting for buyer |
Seller |
When the Seller rejects the fuel delivery schedule submitted by the buyer, the visible status of the schedule is ‘Rejected, waiting for buyer’. |
|
Agreed |
Buyer and seller |
When the seller approves the fuel delivery schedule submitted by the Buyer, the visible status of the schedule is ‘Agreed’. |
4.3. Quality reports
The buyer must, not later than within 7 (seven) business days from the end of the respective delivery week, present to the seller data about the fuel amount actually delivered in the course of the delivery week and the quality parameters of the fuel.
The quality reports can be viewed by selecting /Quality Reports/ in the /Transactions management/ menu. The all quality reports list will be opened in the window (Figure 85).
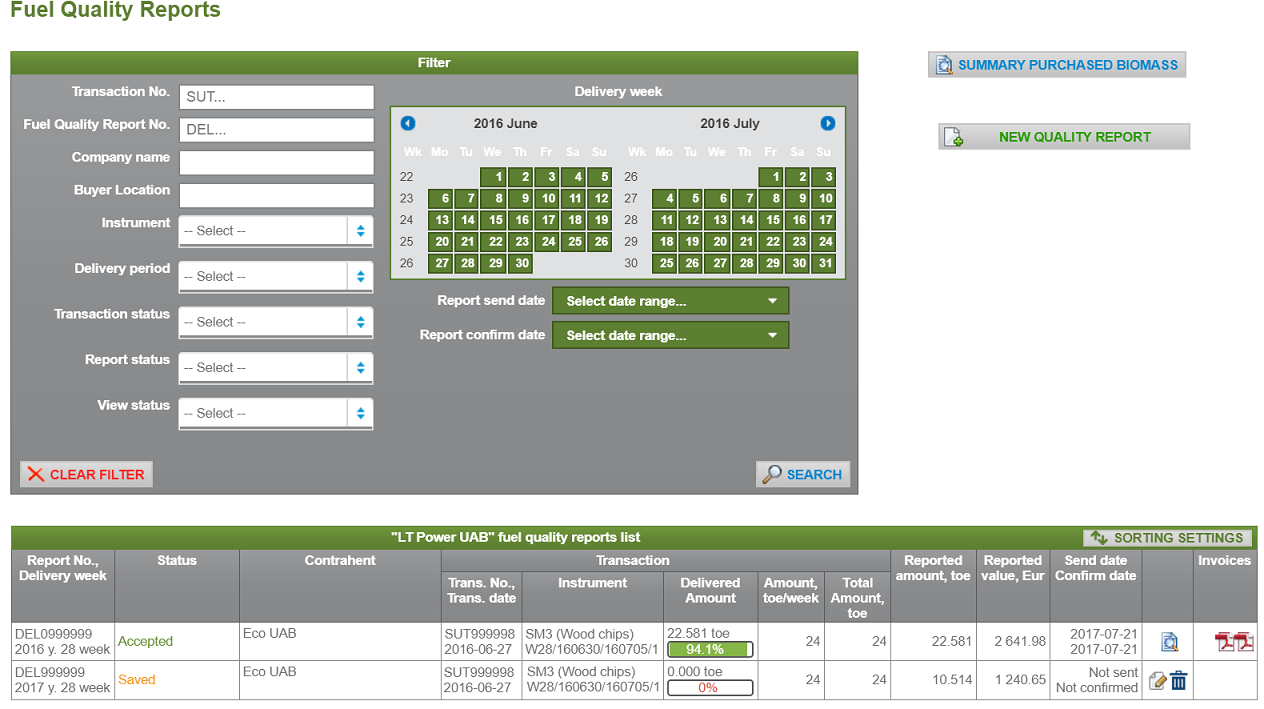
Figure 85. Fuel quality reports list
Fuel quality reports information can be filtered based on the following:
- Transaction No. – if the full or a part of the transaction number is specified, the ETS will display all fuel quality reports formed for the specific transaction;
- Fuel Quality Report No. – if the full or part number of fuel quality report is specified, the ETS will display fuel quality reports which matches the specified criterion;
- Company name – if a full or part name of company is specified, the ETS will display all fuel quality report formed for specified company;
- Buyer Location – if the full or part name of buyer location is specified, the ETS will display all fuel quality reports formed for specified buyer’s site;
- Instrument – the ETS will display all fuel quality reports formed for selected instrument;
- Delivery period – the ETS will display all fuel quality reports formed for selected delivery period;
- Transaction status – the ETS will display all fuel quality reports that are formed for selected transanction’s status;
- Report status – the ETS will display all fuel quality reports which have the selected status;
- View status – the ETS will display all fuel quality reports which have been viewed/ or not.
The fuel quality reports can be displayed for specified time periods, which can be selected in calendar.
After a filter has been selected, click [SEARCH] and the ETS will display quality reports satisfying the selected criteria in the ‘Fuel quality reports list’ table.
All filtering parameters can be canceled by clicking [CLEAR FILTER].
In the ‘Fuel quality reports list’ table, the reports could be displayed according to the selected sorting parameter (Figure 86).
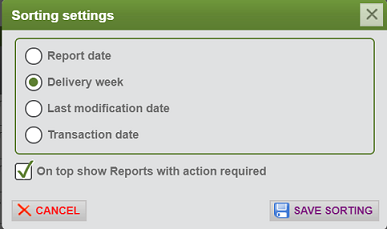
Figure 86. Quality reports sorting element
Other elements of the ‘fuel quality reports list’ table (Figure 85):
-
- Report No., Delivery week – the number of quality report and delivery week. The icon [
 ] indicates new reports that have not been viewed.
 - Status – the status of a fuel quality report:
- Saved – a report that has been formed by the buyer and has not been presented to the seller. Such a report can be deleted and its data can be modified.
- Sent, waiting for confirmation – the buyer has submitted the report to the seller and is waiting for confirmation. A sent report can be deleted by clicking [].
- Received – a status shown to sellers. This status is assigned to received quality reports that have not been confirmed yet. Sellers can either confirm or reject such a report.
- Accepted – after the seller has confirmed a received report, its status is changed to ‘Accepted.’ Such a report can only be viewed. Invoices are issued according to the report data.
- Waiting for buyer (status shown to seller) – if the seller does not agree with the presented quality parameters, it can reject the respective report presented by the buyer, with specification of the reason for rejection.
- Rejected by seller (status shown to buyer) – if the seller rejects a quality report, the buyer may only present a new report. The information of a rejected report may not be adjusted.
- Contrahent – the other party of the transaction.
- Transaction – the information about transaction for which fuel quality report is formed:
- Transaction No., Transaction date – the number and the date of transaction;
- Instrument – an object of trade: fuel type and delivery period;
- Delivered amount – the delivered amount of fuel in units of measurement and as percentage of the total amount under the respective transaction;
- Amount, toe/week – the weekly amount of the transaction;
- Total amount, toe – fuel amount of the transaction per all delivery period.
- Reported amount, toe – the amount of fuel in the fuel quality report.
- Reported value, EUR – the value of the actually delivered fuel, which is calculated as the product of ‘Reported amount, toe’ and ‘Final price, EUR/toe’ (calculated in the quality report with consideration to any discounts provided).
- Send date, Confirm date – the dates of submission and confirmation by buyer of the quality report.
- Icon [] – upon clicking the icon, the ‘Fuel amount and quality report’ (Figure 87) will be displayed. The quality report contains information about the concluded transaction and specification of the amount and quality parameters for the specific delivery week.
- Icon [
 ] – upon clicking the icon, the ‘Fuel amount and quality report’ data entry window (Figure 99) will be displayed.
 - Icon [
 ] – upon clicking the icon, a saved ‘Fuel amount and quality report’ can be deleted.
 - Icon [
 ] – upon clicking the icon, the buyer can review and sign the ‘Fuel amount and quality report’ submitted by the buyer (Figure 87).
 - Icon [] – upon clicking the icon, the invoice formed based on the ‘Fuel amount and quality report’ will be downloaded.
- Report No., Delivery week – the number of quality report and delivery week. The icon [

Figure 87. Fuel amount and quality report
4.3.1. Entry of quality report information
Only buyers can initiate arrangement of quality reports. For this purpose, the buyer must click /Trans./ or /Quality reports/ in the /Transactions management/ menu (Figure 88.)

Figure 88. Menu
After the /Trans./ menu has been clicked, the user must select a transaction in the ‘List of transactions’ table (Figure 64) for which the fuel quality report needs to be agreed on and click the icon [![]() ] at the end of the row. The user must then click ‘Arrange fuel quality’ (Figure 89) in the displayed additional menu.
] at the end of the row. The user must then click ‘Arrange fuel quality’ (Figure 89) in the displayed additional menu.

Figure 89. Additional menu
The fuel quality arrangement window wizard will be displayed. Since a transaction has been selected already, quality arrangement will proceed from Step 2 (Figure 91).
After /Quality reports/ has been selected, [NEW QUALITY REPORT] must be clicked in the displayed window (Figure 85).
Step 1 of the fuel quality arrangement wizard will be displayed (Figure 90), in which a list of all active transactions will be provided. The user must select a transaction for which a report will be formed. The selected transaction will be highlighted in blue.

Figure 90. Fuel quality arrangement window. Step 1
After a transaction has been selected, Step 2 of the report formation process will be displayed (Figure 91). A data entry method must be selected. Data can be either imported or directly entered into the system.

Figure 91. Fuel quality arrangement window. Step 2
4.3.2. Import of quality report information
Data entry by method of data import is implemented by clicking [DATA IMPORT] in Step 2 (Figure 91). After this method has been selected, the wizard will open Step 3 (Figure 92), in which the user must select a method for data import from external data holders: [PASTE DATA FROM EXCEL] or [UPLOAD .CSV FILE].

Figure 92. Fuel quality arrangement window. Step 3
4.3.3. Paste data from Excel
After ‘Paste data from Excel’ method has been selected, the wizard will open Step 4 (Figure 93), in which the data entry field will be available.

Figure 93. Fuel quality arrangement window. Step 4
In the data file (Figure 94), select the data that you want to import to the data entry field. Copy the selected data to RAM by clicking ‘Ctrl+C’ or ‘copy.’ The layout of columns in the MS Excel file is not important; the most important is that the data to be copied include the delivery date, fuel weight, moisture, ash content and lower heating value of dry, ash-free dry or as received.
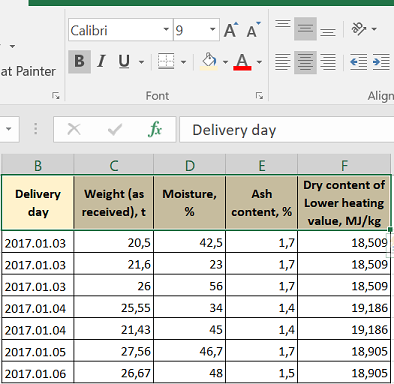
Figure 94. Information in a MS Excel file
In the next step, insert the copied RAM data to the data entry field (Figure 95). This can be done by selecting the data entry field and clicking ‘Ctrl+V’ or ‘paste.’

Figure 95. Fuel quality arrangement window. Step 4
To continue data import, click [NEXT] and the wizard will open Step 5 (Figure 96).

Figure 96. Data assignment window. Step 5
At this stage, a value must be selected from the drop-down list for each of the columns of imported data.
Any unnecessary data rows can be deleted by clicking the icon [![]() ] on the left of the respective row.
] on the left of the respective row.
After all the required data for importing have been selected, click [NEXT] (Figure 96).
NB: The user can save an import data scheme template to be able to assign certain values to data imported in the same manner in the future. A template can be created by ticking the ‘Save template’ option and entering the template name. Then click [NEXT] and Step 4 of the wizard will be displayed (Figure 96).
The template can be subsequently used at the start of Step 5: in this case, the user will not need to identify the values of imported fields manually – the user will be able to do this by selecting the respective template.
In Step 6 (Figure 97), the user must check the data to be imported and tick (on the left of the row) the rows that must be included in the report. If the data is suitable for import, the user must click [NEXT].

Figure 97. Data selecting window. Step 6
The subsequent steps must be performed according to the report submission procedure described in section 4.3.6 ‘Submission of fuel quality reports’.
4.3.4. Upload .csv files
After ‘Upload .csv files’ method has been chosen, the wizard will open Step 4 (Figure 98) with the data file selection window.

Figure 98. Data import window. Step 4
A file can be selected by clicking [Browse…]; after a file has been chosen, click [NEXT].
The subsequent steps must be performed according to the report submission procedure described in section 4.3.6 ‘Submission of fuel quality reports’.
4.3.5. Manual entry of quality report details
To enter data manually, [ENTER MANUALLY] must be clicked (Figure 91). The quality report input window data will be displayed (Figure 99). In the displayed window, the user must enter the results of fuel amount and quality measurements.
All data for the reporting week must be entered in the one report, i.e. only one report must be filled out per week under a specific transaction.
The user must specify only one ‘Lower heating value’ parameter of dry, ash-free or as received, the remaining lower heating value parameters will be calculated automatically based on the entered parameter.
NB: When entering data in the report, the most convenient choice is to assign a separate row to every woodchips vehicle. To insert an additional row, click [INSERT ROW] (Figure 99).
If the moisture and/or ash content parameters do not coincide with the parameters contained in the fuel specification, then fuel price discounts will be calculated automatically according to the requirements laid down in the Regulation.
Price discounts are calculated for the weighted one delivery day values of the moisture and/or ash content parameters.
The subsequent steps must be performed according to the report submission procedure described in section 4.3.6 ‘Submission of fuel quality reports’.

Figure 99. Entry of fuel amount and quality parameters
4.3.6. Submission of fuel quality reports
Having entered the fuel quality parameters, click [SAVE] (Figure 100). The entered data will be grouped by individual calendar days and sum or weighted parameter values will be calculated for each day (Figure 100).

Figure 100. Saved quality report
NB: The system automatically aggregates data off each delivery date. The data are rounded according to mathematical rounding rules. The system will not permit saving data if the data belong to different calendar weeks. The system will highlight the incorrect element and display the respective informational message (Figure 101).

Figure 101. Information message
To submit a report to the seller, [SIGN AND SEND REPORT TO SELLER] must be clicked (Figure 100). The report sending confirmation message will be displayed (Figure 102).
NB: If the fuel quality arrangement confirmation is not ticked (Figure 102), the report will not be sent.

Figure 102. Confirmation message of report sending
To cancel report sending, click [NO] on confirmation message of report sending (Figure 102).
NB: A sent report confirmed by both parties cannot be canceled.
Depending on which button is clicked (Figure 103), a fuel quality report can be printed in the brief or extended form and saved as a .csv file in the brief or extended form.

Figure 103. Command buttons of reports
4.3.7. Confirmation of fuel quality reports (for sellers)
Sellers are informed about a new report by e-mail and menu /Quality reports/ is marked with an icon showing the number of new quality reports (Figure 104).

Figure 104. Menu
In the table ‘Fuel quality reports list’, new reports are indicated with an icon [![]() ] (Figure 105). The status of the new reports is ‘Received’. The seller must view new reports and either sign or reject them. A report can be viewed by clicking the icon [
] (Figure 105). The status of the new reports is ‘Received’. The seller must view new reports and either sign or reject them. A report can be viewed by clicking the icon [![]() ] on the right of the report row.
] on the right of the report row.

Figure 105. List of fuel quality reports
The respective fuel quality reports will be displayed to the seller, which the seller may either confirm and sign or reject (Figure 106).
Figure 106. Received fuel quality report
If the seller agrees with the presented fuel quality parameters, the seller must click [CONFIRM AND SIGN REPORT] (Figure 106). The report signing confirmation message will be displayed (Figure 107). The seller must tick the confirmation and click [YES]. The ‘Accepted’ status will be assigned to the report. A message about confirmation of the report will be sent to the buyer by e-mail.
NB: If the fuel quality arrangement confirmation is not ticked, the report will not be sent.

Figure 107. Confirmation message
4.3.8. Rejection of the quality reports (to the seller)
If the seller disagrees with the quality parameters provided in the quality report, he may reject it by clicking [REJECT REPORT] (Figure 106).
The first step of the wizard for rejection of the quality report will be displayed to the seller (Figure 108). The seller shall tick here the reasons for rejection of the quality report. Several reasons for rejection may be selected.

Figure 108. Rejection of the quality report. Step 1
Possible reasons for rejection of the quality report:
- Moisture – should be chosen in disagreement with the specified overall moisture parameters of fuel;
- Ash content – should be chosen in disagreement with the specified ash content parameters of fuel;
- Lower heating value of dry matter – should be chosen in disagreement with the specified lower heating value of dry matter parameters of fuel;
- Fuel weight – should be chosen when fuel weight specified in the quality differs from the actually delivered weight;
- Delivery dates – should be chosen when the actual delivery dates are different than those specified in the quality report;
- Other – other reason for rejection of the quality report should be specified.
When the seller has chosen the reasons for rejecting the quality report, he shall click [NEXT] (Figure 108).
In the next phase, separate steps of the wizard (Steps 2-6) will be opened to the seller for each disputed parameter (Figure 109 – Figure 113), where the seller shall tick specific values of the parameters he disagrees with.
The disputed parameters will appear on the red background. When all disputed parameters have been ticked, by clicking [NEXT] in each step, the seller will be transferred to the step for specifying the parameters of the next reason for rejection.

Figure 109. Rejection of the quality report. Step 2

Figure 110. Rejection of the quality report. Step 3

Figure 111. Rejection of the quality report. Step 4

Figure 112. Rejection of the quality report. Step 5

Figure 113. Rejection of the quality report. Step 6
By clicking [NEXT] in the last step for selection of the disputed quality parameters, the seller will be transferred to the step for sending of the quality report (Figure 114). The seller shall confirm here being aware of the condition for rejection of the quality report and then click [SAVE].

Figure 114. Rejection of the quality report. Step 7
Upon clicking [SAVE], the quality report rejection confirmation message will be displayed (Figure 115). By clicking [YES] on the confirmation message, the quality report will be rejected. The status and all reasons for report rejection are listed in rejected quality report (Figure 116). The notification on rejection of the quality report will be sent to the buyer by e-mail.
To refuse rejection of the quality report, click [NO] on the confirmation message (Figure 115).

Figure 115. Confirmation of the quality report rejection

Figure 116. Rejected quality report
4.4. List of invoices
After the buyer and the seller have agreed on and confirmed the ‘Fuel amount and quality report’, the ETS will form a VAT invoice based on the data of the report and send it by e-mails to both participants.
The formed VAT invoices can be viewed in the /List of invoices/ menu (Figure 117).

Figure 117. List of invoices window
The invoices information can be filtered based on the following:
- Invoice ID – if the full or a part of the invoice identification number is specified, the ETS will display the invoice which matches the specified criterion;
- Type – the ETS will display all invoices of selected type;
- Transaction No. – if the full or part number of transaction is specified, the ETS will display invoices issued for specified transaction;
- Fuel Quality Report No. – if the full or part number of fuel quality report is specified, the ETS will display invoices issued for specified quality report;
- Invoice Series and No. – if the full or part number of invoice is specified, the ETS will display the invoice which matches the specified criterion;
- Company name – if a full or part name of company is specified, the ETS will display all invoices issued for specified company.
- Invoice date – the ETS will display all invoices issued within the selected time interval in calendar.
After a filter has been selected, click [SEARCH] and the ETS will display invoices satisfying the selected criteria in the ‘Invoices list’ table (Figure 117).
All filtering parameters can be canceled by clicking [CLEAR FILTER].
In the list, invoices that were canceled and for which credit invoices were issued are highlighted in red. Credit invoices are also highlighted in red.
Elements of table ‘List of invoices’ (Figure 117):
- Type – the type of the VAT invoice is specified. Available options: invoice and credit invoice.
- Invoice No. – the series and number of the issued VAT invoice.
- Invoice date – the date of issue of the VAT invoice.
- Transaction No. – the number of the transaction based on which the VAT invoice is issued.
- Quality report No. – the number of the quality report based on which the VAT invoice was issued.
- Delivery period – the number of delivery week and start and end dates of the delivery period.
- Buyer – the name of the legal entity (buyer) or given name and surname of the natural person (buyer) that concluded the transaction.
- Seller – the name of the legal entity (seller) or given name and surname of the natural person (seller) that concluded the transaction.
- Amount, toe – the amount of fuel specified in the VAT invoice.
- Price, EUR/toe – the price of fuel specified in the VAT invoice.
- Value, EUR – the value of the VAT invoice excluding VAT.
- Icon [] – upon clicking the icon, the VAT invoice in the .pdf format will be downloaded.
4.5. Data analytics
Users can select to view data of all transactions concluded in the Exchange, of fuel delivered under individual transactions, data by delivery periods, and data of fuel quality under /Data analytics/ menu (Figure 118).
4.5.1. Analysis of transactions concluded in the Exchange
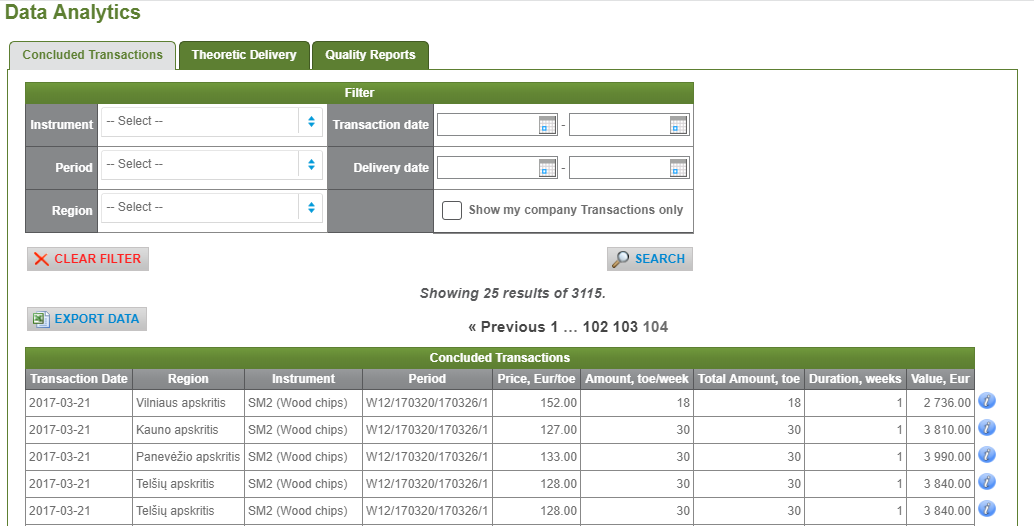
Figure 118. Data analytics. Concluded transactions window
Users can filter information in the concluded transactions window (Figure 118) based on the following:
- Instrument – the ETS will display all transactions for the respective instrument that were concluded in the Exchange.
- Period – the ETS will display all transactions for the respective delivery period that were concluded in the Exchange.
- Region – the ETS will display all transactions for the respective region that were concluded in the Exchange.
- Transaction date – the ETS will display all transactions concluded in the Exchange in the selected period.
- Delivery date – the ETS will display all transactions concluded in the Exchange which are delivered during the selected period.
After a filter(s) has (have) been selected, click [SEARCH] and the system will display transactions matching the selected criteria.
Upon clicking [EXPORT DATA] the system will form an MS Excel file containing all the data that matches the selected criteria (if any).
Elements of table ‘Concluded transactions’ (Figure 118):
- Transaction date – the date of the concluded transaction.
- Region– the region to which fuel will be delivered under the concluded transaction.
- Instrument – the fuel type for which the transaction was concluded.
- Period – the delivery period in the course of which fuel will be delivered under the concluded transaction.
- Price, EUR/toe – the price per 1 toe of fuel.
- Amount, toe/week – the weekly amount of an concluded transaction.
- Total amount, tne – the total amount of the concluded contract, toe.
- Duration, weeks – the number of weeks of a delivery period.
- Value, EUR – the value of the concluded transaction, which is calculated as the product of ‘Amount, toe/week’, ‘Duration, weeks’ and ‘Price, EUR/toe.
- Icon [
 ]– marks transactions concluded by the logged in user. When the cursor is placed on the icon, a message with specification of the respective transaction number and parties of the transaction will be displayed.
4.5.2. Data analytics for theoretic delivery
After the tab ‘Theoretic delivery’ has been clicked in the data analytics window, the system will form a table containing data of all transactions concluded in the Exchange by fuel delivery time (Figure 119).
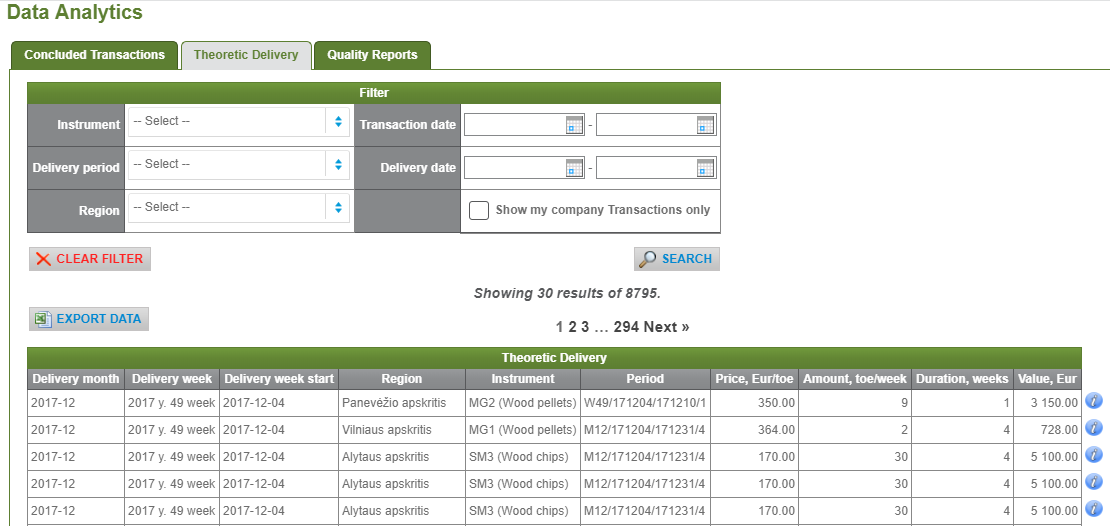
Figure 119. Data analytics. Theoretic delivery window
In the theoretic delivery window, users can filter data based on the following:
- Instrument – the ETS will display all Exchange transactions for the selected instrument under which delivery takes place.
- Delivery period – the ETS will display all Exchange transactions for the selected delivery period.
- Region – the ETS will display all Exchange transactions under which delivery takes place in the selected region.
- Transaction date – the ETS will display all transactions concluded in the Exchange in the selected period.
- Delivery date – the ETS will display all transactions concluded in the Exchange which are delivered during the selected period.
After a filter(s) has (have) been selected, click [SEARCH], and the system will display delivery data matching the selected criteria.
After [EXPORT DATA] has been clicked, the system will form a MS Excel file containing all the data that matches the selected criteria (if any).
Elements of the table ‘Theoretic delivery’ (Figure 119):
- Delivery month – the month in which delivery of fuel takes place is specified.
- Delivery week – the number of a specific delivery week is specified.
- Delivery week start – the first day of the delivery week is specified.
- Region– the region to which fuel will be delivered.
- Instrument – the delivered fuel type.
- Period – the delivery period in which fuel is delivered under a concluded transaction.
- Price, EUR/toe – the price per 1 toe of transaction.
- Amount, toe/week – the weekly amount of an concluded transaction.
- Duration, weeks – the number of weeks of a delivery period.
- Value, EUR – the value of the concluded transaction, which is calculated as the product of ‘Amount, toe/week’, ‘Duration, weeks’ and ‘Price, EUR/toe.
- Icon [] – marks transactions concluded by the logged in user. When the cursor is placed on the icon, a message with specification of the respective transaction number and parties to the transaction will be displayed.
4.5.3. Analysis of quality report information
After the user has clicked tab ‘Quality reports’ in the data analytics window, the system will form a table containing data for all fuel amount and quality reports of the logged in user (Figure 120).

Figure 120. Data analytics. Fuel quality window
In the fuel quality window, users can filter data based on the following:
- Transaction No. – the ETS will display quality reports formed for the selected transaction.
- Company name – the ETS will display quality reports for transactions concluded with the selected company.
- Buyer’s location – the ETS will display quality reports for fuel deliveries to the selected buyer’s trading location.
- Instrument – the ETS will display quality reports formed for the selected instrument.
- Delivery period – the ETS will display quality reports formed for the selected delivery period.
- Transaction status – the ETS will display quality reports formed for transactions with the selected status.
- Report status – the ETS will display quality reports with the selected status.
- Fuel quality report No. – the ETS will display the quality report with the selected number.
- Delivery date from – the ETS will display all quality reports that were formed from the selected date for the selected delivery period.
- Delivery date till – the ETS will display all quality reports that were formed until the selected date for the selected delivery period.
After a filter(s) has (have) been selected, click [SEARCH], and the system will display quality reports matching the selected criteria.
After [EXPORT DATA] has been clicked, the system will form a MS Excel file containing all the data that matches the selected criteria (if any).
4.6. Fuel reserves
4.6.1. Long term Transactions
Pursuant to the Conditions of Trade in Biomass Products of the Exchange, sellers that conclude contracts of purchase and sale of fuel for one-quarter and half-year delivery periods with deliveries during the heating season must accumulate a reserve of 5% of the total undelivered quantity under the concluded contracts.
Firstly, the sellers declare the mandatory reserve in the ETS. Then buyers receive, in the ETS, information about the actual locations of the respective reserve under the concluded contracts.
Information about contracts under which must be accumulated reserve, the total reserve need, the declared quantity, and the lacking reserve need as well as information about the location where the declared reserve is located users can find under /Fuel Reserve/ menu in tab ‘Long term Transactions’ (Figure 121).
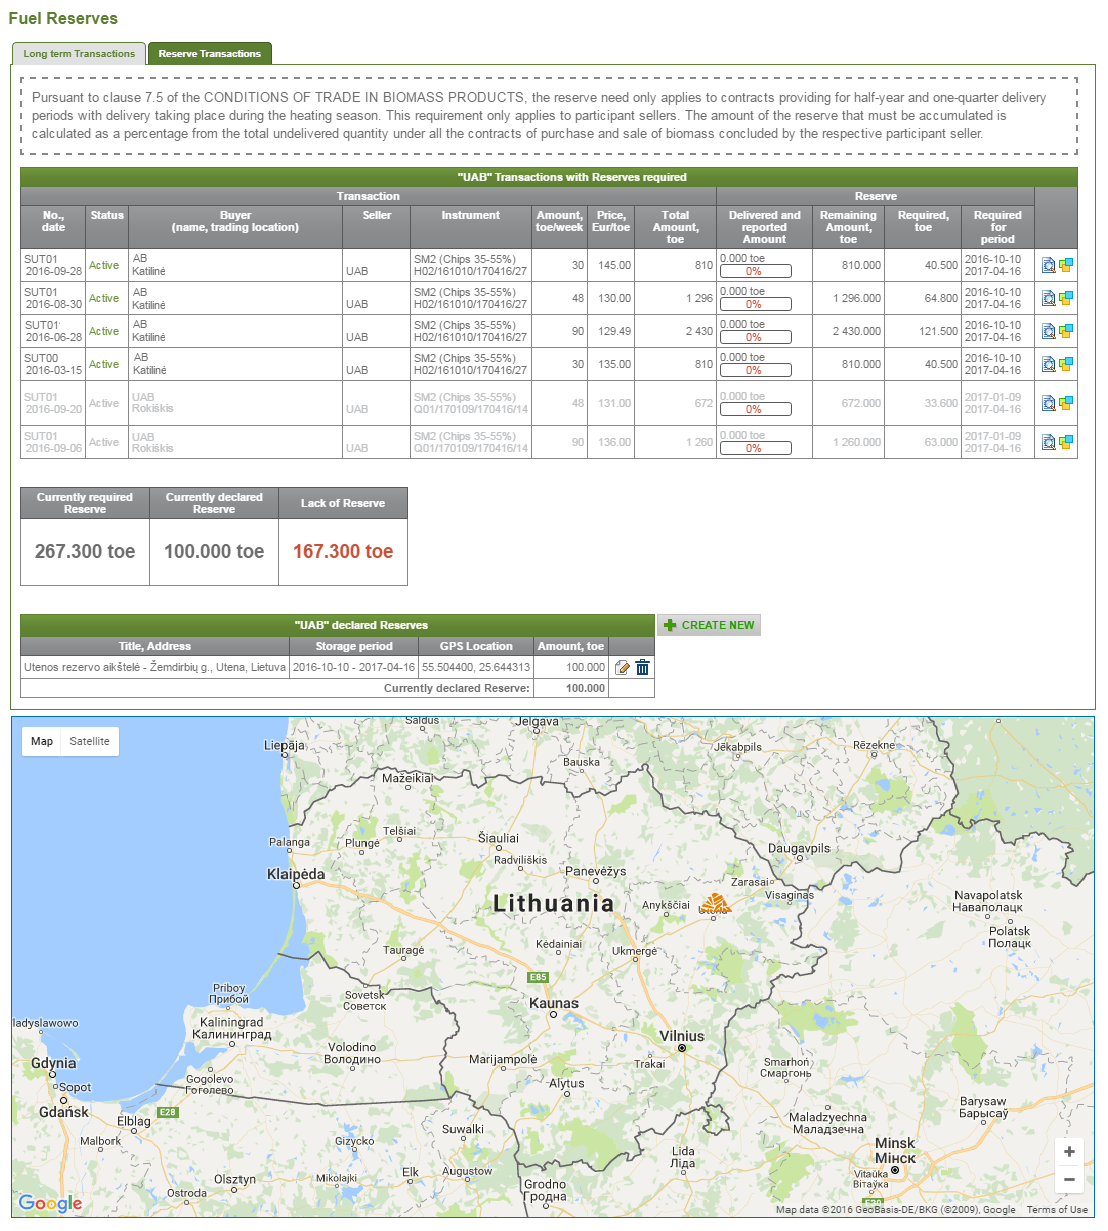
Figure 121. Long term Transactions window
Elements of the ‘Transactions with Reserves required’ table:
-
- Transaction – information of the transaction under which the reserve should be accumulated:
- No, date – contract number and conclusion date.
- Status – contract status; a reserve is only calculated for contracts with the ‘Active’ status.
- Buyer (name, trading location) – the name of the legal entity (buyer) or given name and surname of the natural person (buyer) that concluded the transaction; address of the trading location.
- Seller – the name of the legal entity (seller) or given name and surname of the natural person (seller) that concluded the transaction.
- Instrument – fuel type and delivery period for which the contract was concluded.
- Amount, toe/week – weekly quantity under the contract.
- Price, EUR/toe– price of 1 toe of fuel.
- Total Amount, toe – the total amount of the concluded contract, toe. Calculated as the product of the ‘Amount, toe/week’ and number of delivery weeks.
- Delivered and reported Amount – the amount of fuel agreed on via the ETS, which is evaluated based on the data specified in the ‘Fuel quality and quantity report’.
- Reserve – information on the required reserve that must be accumulated according the transaction
- Remaining Amount, toe – the difference between the ‘Total Amount, toe’ and the ‘Delivered and reported Amount’.
- Required, toe – calculated as the product of the ‘Remaining Amount, toe’ and the required reserve percentage (5%). The required reserve amount is only calculated for contracts under which supply is carried out at the given current moment.
- Required for the period – the reserve accumulation start and end dates are specified. The reserve accumulation period coincides with the fuel delivery period.
- Icon [] –clicking on the icon opens contract information message (Figure 122).
- Icon [
 ] – clicking on the icon buyers can choose the ‘Arrange fuel quality’ or ‘Initiate Transaction closing’, and sellers can ‘Confirm Transaction closing’.
- Transaction – information of the transaction under which the reserve should be accumulated:
Figure 122. Transaction information message

Figure 123. The ‘Reserve summary’ table (for sellers)
Elements of the ‘Reserve summary’ table (Figure 123):
- Currently required Reserve – the calculated amount of ‘Required, toe’ from the ‘Transactions with Reserves required’ table.
- Currently declared Reserve – the amount of the total declared reserve in the ‘Declared reserves’ table (Figure 124).
- Lack of Reserve – the difference between the ‘Currently required Reserve’ and the ‘Currently declared Reserve’.
The ‘Summary of declared Reserves’ table (Figure 124) provides buyers with information about the declared reserve amounts and their locations of all sellers that will supply fuel under concluded one-quarter and half-year contracts during the heating season.

Figure 124. The ‘Summary of declared Reserves’ table (for buyers)
Elements of the ‘Summary of declared Reserves’ table:
- Seller – the name of the legal entity or given name and surname of the natural person that concluded the transaction.
- Currently required Reserve – the reserve that must be accumulated by a specific seller under all contracts from the ‘Transactions with Reserves required’ table. The reserve amount is calculated as the total amount of the ‘Required, toe’ for the specific seller.
- Currently declared Reserve – the amount of the accumulated reserve declared by the seller:
- Address – name and address of the declared reserve location.
- Reserve period – a period specified by the seller, during which the reserve will be accumulated in the specified location;
- Amount – the reserve amount in the specified location accumulated for contracts of the specific buyer.
- Lack of Reserve – the difference between the ‘Currently required Reserve‘ and the ’Currently declared Reserve’.

Figure 125. The ‘Declared reserve’ table
Elements of the ‘Declared reserves’ table (Figure 125):
- Title, address – name and address of the declared reserve location.
- Storage period – the reserve storage period specified by the seller.
- GPS Location – the GPS coordinates of the specific reserve location.
- Amount, toe – the reserve amount accumulated at the location, toe.
- Icon [
 ] – after the icon is clicked, the declared reserve location editing window is displayed (Figure 126).
 - Icon [
 ] – after the icon is clicked, the declared reserve location can be deleted.
 - Currently declared Reserve – the total declared reserve amount valid on the current day is calculated.
4.6.2. Entry of a new reserve location (for sellers)
Sellers can create a new reserve location in the Long term Transactions window (Figure 121), after clicking the [CREATE NEW] button. A window for declaring a new reserve location will be displayed (Figure 126).

Figure 126. The new reserve location declaration window
When declaring a new reserve location or editing an entered location, sellers must specify the following information:
- Reserve Location Title – name of the seller’s reserve location.
- Reserve storage period – the period from the time and until when will be accumulated reserve.
- Amount, toe – amount of the accumulated reserve.
- Address – address of the reserve location.
Sellers must also specify that the information that they have entered is correct. After all the information has been entered, [SAVE] must be clicked to save it. To cancel declaration of a new location or discard changes to an existing location, click [CANCEL].
4.6.3. Deletion of a reserve location (for sellers)
Sellers can delete the entered reserve locations by clicking the icon [![]() ] in the ‘Declared Reserves’ table of the Long term Transactions window (Figure 121).
] in the ‘Declared Reserves’ table of the Long term Transactions window (Figure 121).
Clicking the icon [![]() ] opens the reserve location deletion confirmation message (Figure 127). If [YES] is clicked, the selected reserve location will be deleted. If [NO] is clicked, the selected reserve location will not be deleted.
] opens the reserve location deletion confirmation message (Figure 127). If [YES] is clicked, the selected reserve location will be deleted. If [NO] is clicked, the selected reserve location will not be deleted.

Figure 127. Confirmation message
4.7. Waybills
The waybill submission function of the ETS provides an option to submit waybill data for fuel deliveries under transactions concluded in the Exchange to the i.VAZ sub-system of the State Tax Inspectorate (hereinafter referred to as the VMI).
4.7.1. Requirements for waybill details
The function for submitting waybill data to i.VAZ is only available to sellers.
NB: The seller should to contact the Operator to activate function.
Waybill data can be submitted via the ETS to i.VAZ not earlier than 7 (seven) calendar days before the fuel dispatch date, but not later than on the day and time of fuel dispatch specified in the respective waybill.
Table 5
Mandatory details of waybills
|
Details |
Data entered by the ETS |
Data entered/selected by user |
|
|
Waybill’s creator |
+ |
||
|
Date waybill issued |
+ |
||
|
Consignor’s details |
Company Reg. No./ Personal No. |
+ |
|
|
Company name or given name and surname of a natural person |
+ |
||
|
Address |
+ |
||
|
Transporter’s details |
Company Reg. No., Personal No. |
+ |
+ |
|
Company name or given name and surname of a natural person |
+ |
+ |
|
|
Address |
+ |
+ |
|
|
Vehicle No. |
+ |
||
|
Consignee’s details |
Company Reg. No., personal No. |
+ |
|
|
Company name or given name and surname of a natural person |
+ |
||
|
Address |
+ |
||
|
Goods details |
Dispatch date and time |
+ |
|
|
Address of loading |
+ |
||
|
Address of unloading |
+ |
||
|
Name of goods |
+ |
||
|
Amount/weight of goods |
+ |
||
4.7.2. Entry of waybill data and submission of waybill data to the VMI
Waybills can be formed for ‘Active’ transactions, under which delivery must take place during selected delivery period.
The waybill data submission function is accessible via the /Waybills/ menu. A list of current-week delivery schedules for all the transactions concluded in the Exchange will be displayed to sellers (Figure 128).
In the filtering element, the user can choose to view delivery schedules by calendar delivery weeks or specific calendar days of a selected calendar week. Data can be filtered by selecting a delivery period and clicking [SEARCH].

Figure 128. Delivery schedules window
The displayed table contains all delivery schedules of the selected delivery period.
The elements of table ‘Delivery schedule for week’:
- Transaction No. – the transaction, for which the delivery schedule has been made.
- Delivery – the start and end dates of the delivery week.
- Instrument – the type of fuel supplied under the transaction.
- Amount, toe – weekly fuel amount according to transaction.
- Company name – the name of the buyer’s legal entity or buyer’s given name and surname of the natural person that concluded the transaction.
- Address – the name and address of the buyer’s site.
- Delivery Schedule Status – the status of the delivery schedule. Read more in section 2.4 ‘Statuses of fuel delivery schedules’.
- Count of Waybills – the ETS displays the indicative number of waybills must be formed for such transaction’s amount.
New waybill data is entered or adjusted by clicking the respective delivery schedule row in the delivery schedules window (Figure 128). The ETS will display elements for entering waybill data (Figure 129).

Figure 129. Entry of waybill data
The user must specify only the variable details of the waybill:
- Vehicle or Trailer license plate – the vehicle or trailer license plate number must be entered. When a number is entered for the first time, it will be associated with the carrier specified in the succeeding element and saved in the ETS. When the same number or its part is entered once again, the ETS will display the vehicle selection element. After the required vehicle has been clicked in the displayed element, the system will fill in the remaining details of the carrier automatically (Figure 130).

Figure 130. Carrier details
- Carrier – the party that will implement fuel delivery must be selected. Possible options:
- Name of seller – after this element has been selected, it will be specified that fuel will be delivered by the seller using its own vehicle. In this case, the carrier’s data in the waybill will coincide with the seller’s (sender’s) data.
- Other deliverer – after this element has been selected, the ETS will display the carrier’s data entry element. The carrier’s Company Reg. No., company name and address must be specified (Figure 131).

Figure 131. Entry of carrier details
- Waybill No. – user must specify the number of waybill.
- Load location – the fuel loading location address must be specified.
- Amount – the ETS will automatically specify the amount, which normally fits into one vehicle. The user can choose from several units of measurement and adjust the amount. Available options:
- Loose cubic metres (92 lcm will be specified automatically);
- Solid cubic metres;
- Transportation date/time – the user must select a specific delivery date and time interval when he will deliver the fuel. The date selection is limited to the delivery week.
Having entered the waybill data, the user must save them by clicking [SAVE]. The ETS will notify the user about saved data by displaying an informational message (Figure 132).
![]()
Figure 132. Informational message
After the data has been saved, the respective waybill receives the ‘Not submitted’ status. The following steps can be performed on waybills with the ‘Not submitted’ status:
- Update – after any data of a saved waybill has been adjusted, the data must be updated by clicking [
 UPDATE]. After the data has been updated, the ETS will display the respective informational message (Figure 132).
 - Submit to VMI – waybills can be submitted to the i.VAZ subsystem of the VMI by clicking [
 SUBMIT TO VMI]. Only ‘Not submitted’ waybills can be submitted to the VMI. After a waybill has been submitted, it will be assigned with an i.VAZ registration number. The status of the waybill will be changed to ‘Submitted’.
After the command button has been clicked, the ETS will display a message (Figure 133) of confirmation of data sending to the VMI. If [YES] is clicked, the waybill data will be submitted to the i.VAZ subsystem, if [NO] is clicked, data submission will be canceled.

Figure 133. Confirmation message
After the waybill data has been successfully submitted to the VMI, the ETS will display the respective informational message (Figure 134).
![]()
Figure 134. Informational message
- Delete waybill – only waybills that have not been submitted to the VMI can be deleted. A waybill can be deleted by clicking [ DELETE WAYBILL] (Figure 130).
After the command button has been clicked, the ETS will display the deletion confirmation message (Figure 135). If [YES] is clicked, the waybill data will be deleted, if [NO] is clicked, data deletion will be cancelled.

Figure 135. Deletion confirmation message
After a waybill has been deleted, the ETS will display the respective informational message.
![]()
Figure 136. Informational message
After [![]() ADD ROW] has been clicked at the bottom of the displayed waybill data submission element (Figure 137), a new waybill entry element will be inserted.
ADD ROW] has been clicked at the bottom of the displayed waybill data submission element (Figure 137), a new waybill entry element will be inserted.

Figure 137. Entry of an additional waybill
4.7.3. Waybill formation and submission errors
When the seller forms a new waybill, but fails to provide data or provides data not satisfying the set requirements, the ETS will display error messages with specification of incorrect and/or missing data.
- If the user fails to specify the mandatory waybill details, the respective data element will be accompanied by an informational message (Figure 138).

Figure 138. Informational message
- If the user saves a new waybill or attempts to submit waybill to the VMI while the waybill specifies a delivery time that is earlier than the current time, the ETS will display an error message and the waybill will not be saved or submitted to the VMI.
![]()
Figure 139. Error message
4.7.4. List of waybills
Sellers can view all waybills that were initiated and submitted to the VMI in the waybills list (Figure 140). The ETS will display the waybills for the current week. To view data for other periods, the required filtering criteria must be selected in the filtering element.

Figure 140. Waybill list
Waybill information can be filtered based on the following:
- Transaction No. – if the full or a part of the transaction number is specified, the ETS will display all waybills formed for the specific transaction;
- Buyer – if a buyer name is specified, the ETS will display all waybills under which delivery of fuel was carried out to the specified buyer;
- Waybill No. – if the full or part of waybill number is specified, the ETS will display all waybills which matches the specified criterion;
- VAZ No. – if the full or a part of the number is specified, the ETS will display all waybills that match the specified criterion;
- Vehicle No. and name – if the full or a part of a vehicle number or name is specified, the ETS will display all waybills in which the vehicle matches the specified criterion;
- Carrier code – if the full or a part of the carrier code is specified, the ETS will display all waybills in which the carrier matches the specified criterion;
- Carrier name – if the full or a part of the carrier name is specified, the ETS will display all waybills in which the carrier name matches the specified criterion;
- Load location – if the full or a part of the load location address or name is specified, the ETS will display all waybills in which the load location matches the specified criterion;
- Waybill status – if a status is selected, the ETS will display all waybills with the selected status;
- Delivery period – if a delivery week is selected, the ETS will display all waybills under which delivery takes place in the selected period.
Filtering can be performed by selecting the required criteria and clicking [SEARCH]. All filtering parameters can be canceled by clicking [CLEAR FILTER]. After the filter has been cleared, the ETS will display data for the current delivery week.
Elements of table ‘Waybills of’:
- Waybill No., i.VAZ No. – the waybill and i.VAZ registration numbers. i.VAZ number assigned to submitted waybills only.
- Transaction No. – the number of transaction for which the waybill was formed.
- Waybill status – the waybill status is specified.
- Buyer – the buyer’s name to whom the fuel is delivered;
- Vehicle No., Name – the number and name of the vehicle that will be used to deliver fuel.
- Carrier data – company registration. No. (for legal entities) or personal No. (for natural persons) of the carrier, company name or given name and surname, and address. If fuel is delivered by the seller, the seller’s details must be specified.
- Load location – the fuel loading address.
- Amount/Weight– the fuel amount or weight specified in the waybill.
- Delivery date and time– the fuel delivery date and time interval specified in the waybill.
- Actions:
- [] – waybills can be submitted to the i.VAZ subsystem of the VMI by clicking the icon.
- [] – waybills that have not been submitted to the VMI can be deleted by clicking the icon.
- [] –after the icon has been clicked, the waybill will be canceled from the VMI.
- [] – user can generate waybill document, by clicking the icon.
- [
4.7.5. Adjustment of waybill data
When the user wishes to adjust submitted waybill data, it must take the following into account:
- Data can be adjusted not later than within 5 (five) business days from the goods dispatch date specified in the waybill;
- Data can ONLY be adjusted in the i.VAZ subsystem;
- The ETS only has the waybill cancellation function; a waybill can be canceled not later than within 5 (five) business days from the goods dispatch date specified in the waybill.
NB: Please note the reasons for waybill cancellation: if a waybill for an EXECUTED DELIVERY is canceled and the data of such a waybill must be ADJUSTED ONLY, no new waybill can be submitted due to the expired deadline for submitting the waybill data (the submission of waybill data can be performed prior to the start of fuel dispatch).
The following data can be adjusted in the i.VAZ subsystem of the VMI within 5 (five) business days:
- Scheduled delivery date and time: can only be adjusted in case the data of the recipient, carrier and/or delivery location need adjustment;
- All data of the recipient: code, type, company name or given name and surname; address, and contact information;
- All data of the carrier: code, type, company name or given name and surname; address, and contact information;
- All data of vehicles: number plate, make, model, seal ID, and seal/commercial seal description;
- All data of drivers: given name and surname.
- All data of the unloading location: warehouse No. or name, customs code, and location address;
- Additional information about the goods;
- Fields for entering document details: specification of document, document type, date and number;
- Instructions to the carrier.
4.7.6. Cancellation of waybills in i.VAZ
Waybills that were submitted to the VMI can only be canceled in the i.VAZ subsystem via the ETS. This can be performed by selecting the required waybill in the waybill’s window (Figure 141) and clicking [![]() ].
].
Figure 141. List of waybills
After the command button has been clicked, the ETS will display the cancellation confirmation message (Figure 142). The user must select the reason for cancellation and click [YES], if the user wants to delete the waybill, or click [NO] to cancel the cancellation.

Figure 142. Confirmation of waybill cancellation
4.7.7. Reasons for canceling waybills
Possible reasons for canceling a waybill from the i.VAZ subsystem of the VMI:
- Printing error;
- Terminated commercial transaction;
- Redundant documents;
- Transportation not started on the dispatch date;
- Goods returned to sender;
- Other (a reason for cancellation must be specified).
After a waybill has been canceled, the ETS will assign the ‘Canceled’ status to it and display the respective informational message (Figure 143). No actions can be performed on waybills with the ‘Canceled’ status.

Figure 143. Informational message
Waybills that were submitted to the VMI can be canceled within 5 (five) business days from the fuel delivery date specified in the respective waybill. If the user attempts to cancel a waybill on expiry of the deadline for cancellation, the ETS will display the respective informational message and the waybill will not be canceled from the VMI.

Figure 144. Informational message
5. SETTINGS
5.1. Account settings
The user can modify its contact information, the maximum transportation distance, the passwords used for logging in to the ETS and administer its e-mail messages, in the /Account settings/ menu.
When the user logs in to the ETS for the first time, the ETS will display informational messages (Figure 145 – Figure 146) specifying that the user has not specified its contact information and/or that the seller has not set the maximum transportation distance.

Figure 145. Informational message

Figure 146. Informational message
After the user has clicked the Account settings link in the informational messages (Figures 145, 146), the account settings window will be displayed.
Account settings can also be accessed via the /Settings/ menu of the ETS.

Figure 147. Account settings window
Table ‘Account settings’ elements:
- User data:
- E-mail – the e-mail address specified by the user, to which notifications of the Exchange will be sent.
- Phone – the telephone number specified by the user.
- Maximum transportation distance, km – (the element is only displayed to sellers). The maximum transportation distance to the buyer’s location specified by the seller and acceptable to the seller for delivery of fuel. After the distance has been changed, the new distance will apply only to orders placed after the change is made.
- Biomass Exchange member category – the category to which the Operator has placed the member. Categories A, B, C and D are available. Read more about the placement of members in categories in the Rules for Placing Participants in Categories. This information may only be adjusted by the Operator.
- Phone number for SMS login – the telephone number specified by the user, to which login password codes will be sent.
- Password – the encoded user password.
- Send e-mail messages about – the information that the user wishes to receive must be ticked.
- My transactions – notifications about transactions concluded by the user will be sent to the user’s and to additional (if specified) e-mail addresses.
- All (company) transactions – notifications about all transactions concluded by the other users of the company, which the logged in user represents, will be sent to user’s and to additional (if specified) e-mail addresses.
- My fuel quality reports – notifications about quality reports agreed on by the user will be sent to the user’s and to additional (if specified) e-mail addresses.
- All (company) fuel quality reports – notifications about quality reports agreed on by the other users of the company, which the logged in user represents, will be sent to user’s and to additional (if specified) e-mail addresses.
- My delivery schedule reports – notifications about delivery schedules that are agreed on by the user will be sent to the user’s and to additional (if specified) e-mail address.
- All (company) delivery schedule reports – notifications about delivery schedules that are agreed on by the other users of the company, which the logged in user represents, will be sent to user’s and to additional (if specified) e-mail addresses.
Account parameters can be changed by clicking [EDIT] (Figure 147). The parameter change element will be displayed (Figure 148).

Figure 148. Account settings change element
Parameters can be changed by entering the required new parameters in the element row by means of a keyboard and clicking [SAVE]. To discard changes, click [CANCEL].
5.2. Trading locations
To be able to trade in the Exchange, the company must have at least one trading location. A seller’s trading location indicates from where fuel is sold, while a buyer’s trading location indicates where fuel must be delivered. The number of trading locations that a company may have is unlimited.
Buyers’ trading locations are entered by the Operator based on the information they provide in their Participant Questionnaires.
When a seller logs in to the ETS for the first time, the ETS will display an informational message (Figure 149) specifying that the seller has not created any trading locations in its account.

Figure 149. Informational message
After the Trading locations link in the informational message (Figure 149) has been clicked, the trading locations window will be displayed (Figure 150).
Trading locations can be created, managed and accessed via the /Trading locations/ submenu of the /Settings/ menu of the ETS. New trading locations can be created and existing locations can be deleted or modified in the trading locations window (Figure 150). Furthermore, a map with all buying locations is available for informational purposes. If the user is a seller, the user will be able to see its own selling locations, while those of the other sellers will not be visible.
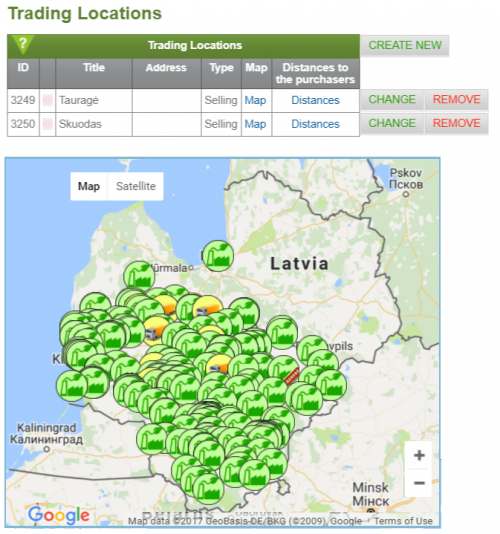
Figure 150. Trading Locations
Elements of the ‘Trading Locations’ table:
-
- ID – the unique number of the trading location in the ETS.
- Title – the name of the trading location specified by the user.
- Address – the trading location address provided by the user. The icon [
 ] means that fuel will be weighed in another location.
 - Type – the type of trading location: buying or selling.
- Map – after the Map link has been clicked, a map with specific trading location place in it will be displayed. If fuel must be weighted in a different location, the route to the weighing location will be indicated.
- Distances to the purchasers – the element is only visible to sellers. After the Distances link has been clicked, the distances window (Figure 151) will be displayed, in which distances from a specific trading location to all the buying locations registered with the ETS will be shown.

Figure 151. Distances
Elements of ‘My Trading Location’ table:
- Trading location name– the name of the trading location specified by the seller.
- Delivery types – the method for delivering fuel from the trading location is specified. Available options: truck delivery or railway delivery.
- Coordinates – the coordinates of the seller’s trading location. After the coordinates link has been clicked, a map with the specific trading location will be displayed.
Elements of the ‘Distances to other locations’ table:
- Region – the district in which the buyer’s trading location is situated.
- Exchange member. Trading location – the buyer’s (legal person’s) name or (natural person’s) given name and surname and trading location name and address are specified.
- Biomass type and unloading conditions – the type of fuel used in the specific trading location and the applicable unloading conditions are specified.
- Distance, km – the distance from the selling location to a specific buying location; the figure after ‘+’ shows the distance to the weighing location.
- Revised distance, km – the distance to the trading location adjusted by the seller. To adjust the transportation distance, please e-mail the Operator to [email protected].
- Route – after the Route link has been clicked, a map with specification of the route from the seller to the buyer’s location will be displayed.
5.2.1. Entry of a new trading location (for sellers)
Sellers can create a new trading location by clicking [CREATE NEW] in trading locations window (Figure 150). Data of a current trading location may be adjusted by clicking [CHANGE] in the same window. In both cases, the trading location creation and change window will be displayed (Figure 152).

Figure 152. Creating and changing locations
When creating a new or adjusting an existing trading location, the following data must be provided:
- Type – the type of trading location specified in the ETS by type of the logged in user.
- Delivery type – the type of delivery from the trading location is specified. Available options: truck delivery and railway delivery.
- Railway station – if railway delivery is selected, the railway station from which fuel will be delivered must be selected.
- Location name – the trading location name in the ETS is shown to all users and must therefore be clear and easy to understand to other ETS users.
- Address or description – additional information about the location must be entered in this element. This field is not shown to other ETS users.
- Address – the accurate address of the trading location must be entered or the precise location of the trading location must be set on the map by clicking the mouse. The selected location of the trading location is marked on the map with an icon. Please make sure that the coordinates be also specified. If the coordinates are not specified, then mark the required location on the map and the coordinates field will be filled out automatically.
After all the data has been entered, trading location’s data can be saved by clicking [SAVE] (Figure 152). After a trading location has been created or adjusted, the ETS will display the respective informational message (Figure 153).
To cancel creation of a new trading location or adjustment data of a current location, click [CANCEL] in trading location creating or adjusting window (Figure 152).

Figure 153. Informational message
5.2.2. Deletion of a current trading location
To delete an existing trading location, user should click [REMOVE] next to the required trading location in the table of the trading location window (Figure 154).
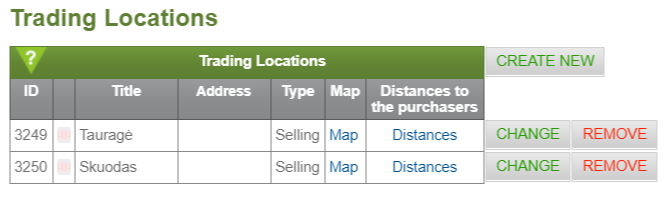
Figure 154. Trading location window
The ETS will display a message of confirmation of deletion of the selected trading location (Figure 155).

Figure 155. Confirmation message of deletion of a trading location
If [YES] is clicked, the trading location will be deleted and a deletion confirmation (Figure 156) will be displayed in the ETS heading.
![]()
Figure 156. Confirmation of deletion
If the user attempts to delete a trading location, which has been selected in an active order, i.e. in an order with the ‘Active’ status, the ETS will not allow deleting such a location and the respective informational message (Figure 157) will be displayed in the ETS heading.

Figure 157. Informational message
The trading location creation, deletion and modification functions are not active for buyers – these functions can only be performed by the Operator based on buyer requests.
5.3. Company settings
5.3.1. Users management
The /Company settings/ menu provides all users with an opportunity to view which rights have been granted to users of their respective companies. Users that have been granted the company administrator rights may modify the rights granted in the ETS to other users from their company.
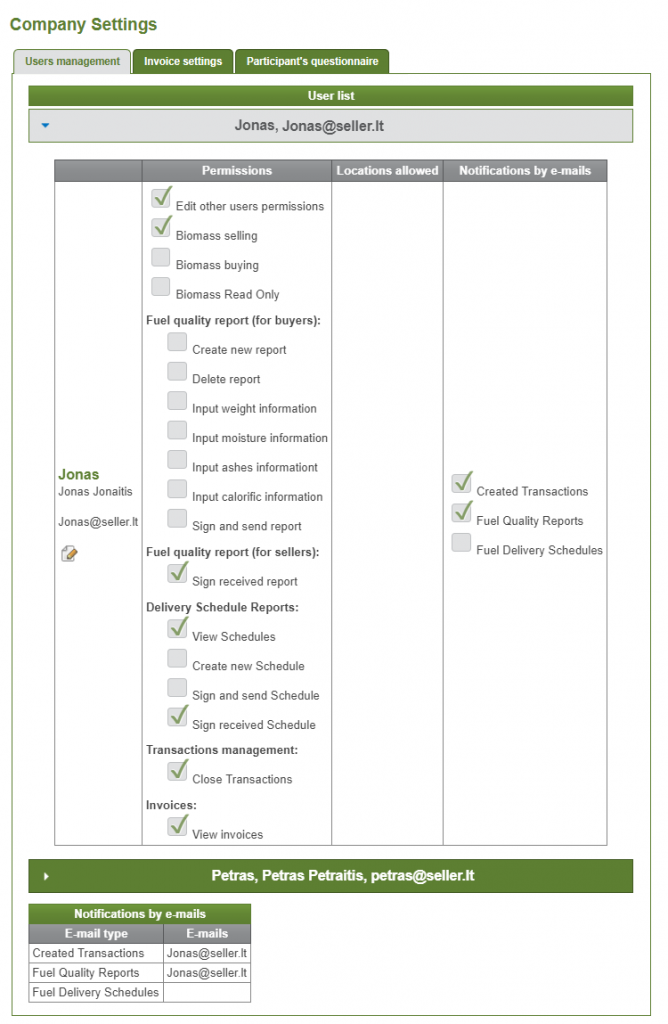
Figure 158. List of users
After the icon [![]() ] has been clicked in user’s list table (Figure 158), only active selections can be modified in the displayed window (Figure 159). In ‘Permissions’, ‘Locations allowed’ and ‘Notifications by e-mails’ columns, the company administrator can choose what rights grant to the other users of the company and what notifications that user should receive by e-mail. After the required rights have been assigned, click [SAVE].
] has been clicked in user’s list table (Figure 158), only active selections can be modified in the displayed window (Figure 159). In ‘Permissions’, ‘Locations allowed’ and ‘Notifications by e-mails’ columns, the company administrator can choose what rights grant to the other users of the company and what notifications that user should receive by e-mail. After the required rights have been assigned, click [SAVE].

Figure 159. Adjustment of user rights
After the user’s data has been changed, the ETS will display the respective informational message (Figure 160).
![]()
Figure 160. Informational message
To cancel user’s data adjustment, click [CANCEL] in the user’s rights adjustment message (Figure 159).
5.3.2. Invoice settings
Users can also view the details of VAT invoices issued for delivered fuel (Figure 161). To have the details changed, an application must be submitted to the Operator.
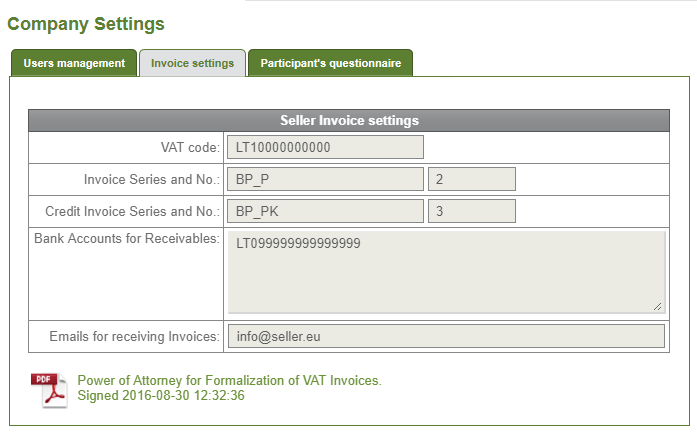
Figure 161. VAT invoices details
5.3.3 Participant’s questionnaire
The Exchange participants must, throughout the term of the participant agreement, comply with the requirements set for them. The participants must update Par ticipant’s questionnaire data provided to the Operator if it has changed.
The Participant’s questionnaire data can be subbmited by clicking the tab /Participant’s questionnaire/ under /Company Settings/ meniu. The data update wizard Step 1 will be opened (Figure 162).
The participant should update company requisite information in step 1 and click [NEXT]. The wizard step 2 will be opened (Figure 163).

Figure 162. Participant’s questionnaire wizard. Step 1.
The participant should update the company manager’s and users’ data in wizard step 2.
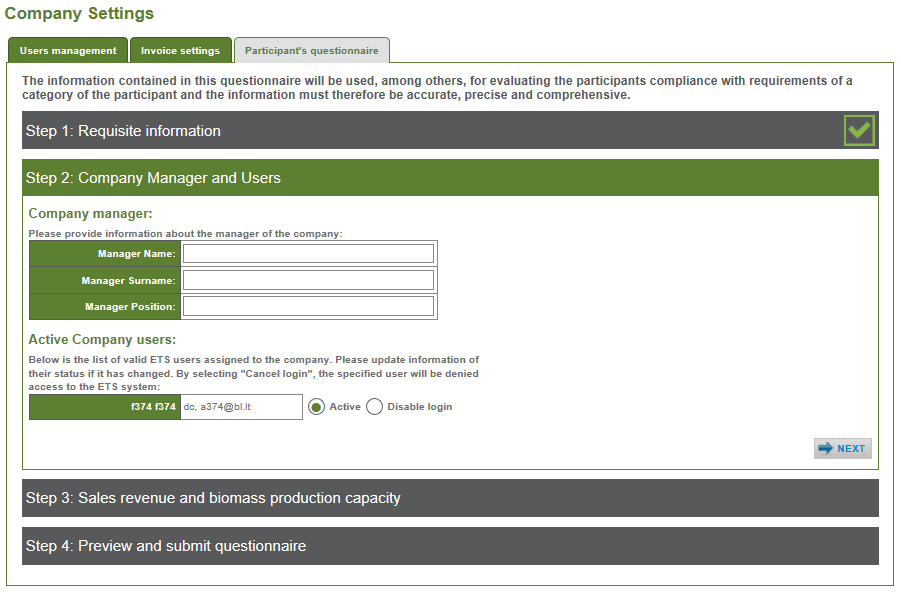
Figure 163. Participant’s questionnaire wizard. Step 2.
The seller’s should provide the sales revenue and biomass production capacity data in the Participants questionnaire wizard step 3 (Figure 164).
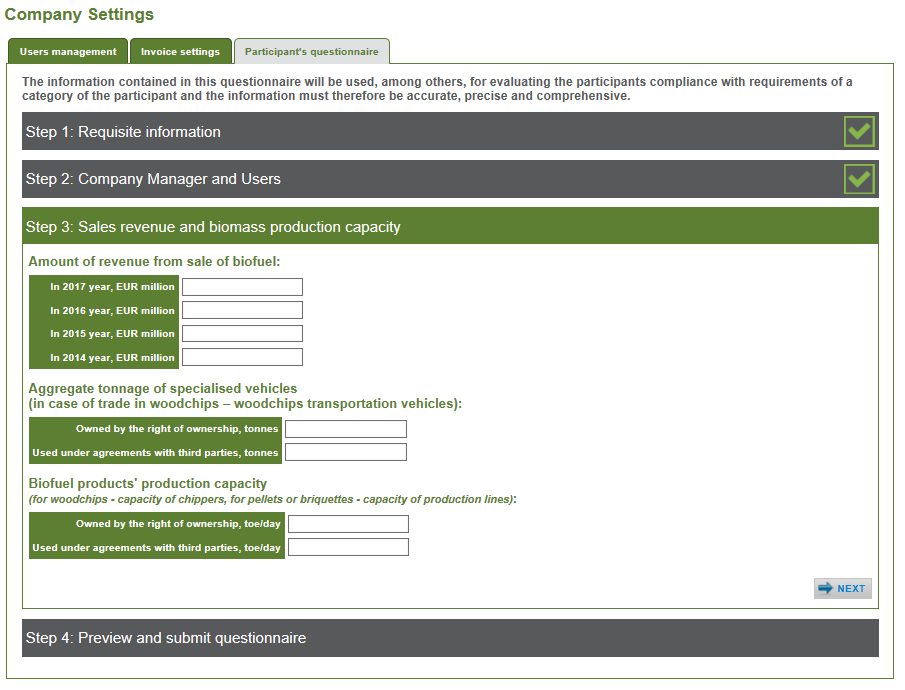
Figure 164. Participant’s questionnaire wizard. Seller’s step 2.
The buyer’s should provide the technicak data of all his buying locations in the Participants questionnaire wizard step 3 (Figure 165).
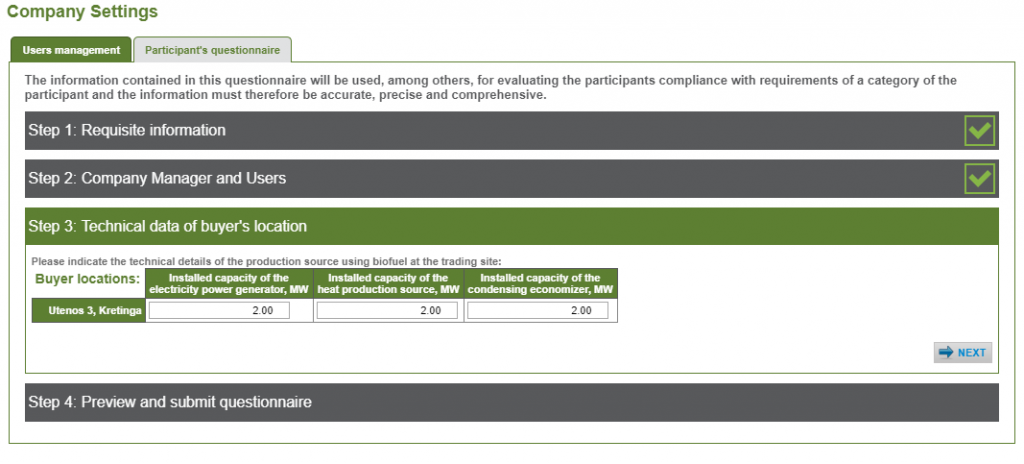
Figure 165. Participant’s questionnaire wizard. Buyer’s step 3.
After participants enters data, to preview and submit data to Operator should click [NEXT]. The wizard step 4 will be opened (Figure 166).
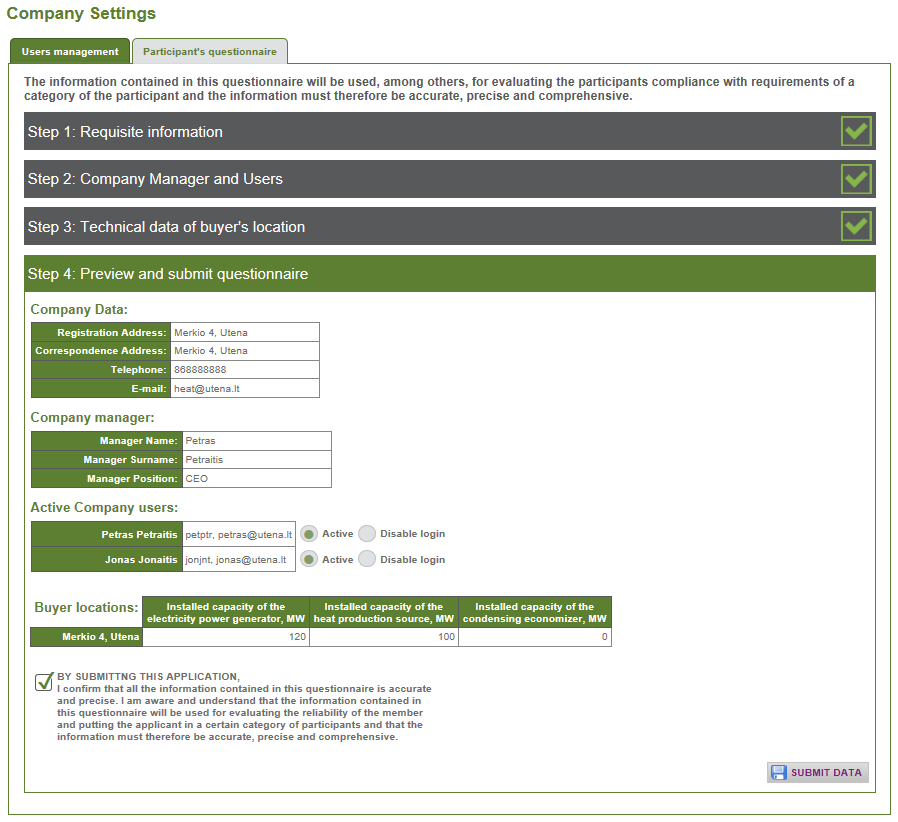
Figure 166. Participant’s questionnaire wizard. Step 4.
In this step the user should to check data to be submited and tick the mark “BY SUBMITING THIS APPLICATION” to confirm that he has familiarised himself and accept the conditions for submitting questionnaire and click [SUBMIT DATA]. The submision confirmation message will be opened (Figure 167).

Figure 167. Confirmation message
6. URGENT MARKET MESSAGES (UMM)
Urgent market messages (hereinafter the UMM) provided by Exchange participants, which affects the consumption of fuel (e.g. installation failures, scheduled repair works, etc.) is published in the ETS and on the Operator’s website.
Registered Exchange participants must publish their UMM in accordance with the Rules on the Supervision of the Energy Resources Market approved by Resolution No. 03-744 of 17 December 2013 of the National Commission for Energy Control and Prices.
6.1. Publication of UMM
UMM can be viewed via the /Urgent market messages/ submenu. ETS will display all published UMM (Figure 162).

Figure 162. Urgent market messages
To initiate publication of a new UMM, click [NEW URGENT MARKET MESSAGE] in the UMM list window (Figure 162). The UMM publication wizard will be displayed (Figure 163). The user must then select the template of UMM that the user needs to publish.

Figure 163. Urgent market message publication wizard. Step 1
After the publication template has been selected, Step 2 of the UMM publication will be displayed.
6.1.1. Equipment failure or scheduled repair UMM
After user clicks [Equipment failure or scheduled repair], he should provide the following information in the opened wizard step 2 (Figure 164):
- (1) The box ‘Company’ is filled in by the system;
- (2) In the box ‘Equipment’, the heating power plant’s adress shall be selected, about which the UMM is published;
- (3) In the box ‘Installed capacity of equipment’ the installed capacity of the selected heating power plant in MW (megawatts) shall be entered;
- (4) ‘Event’ shall be selected from the provided list of the event type. Available types:
- equipment failure;
- scheduled repair.
- (5) ‘Event duration: from’ – the date of the event occurrence shall be specified;
- (6) ‘Event duration: to’ – the date of expected completion of the event shall be specified;
- (7) ‘Acceptance of the fuel’ – the amount of fuel (in percent) accepted according to effective contracts during the event shall be specified;
- (8) ‘Additional information’ – other important information shall be specified, which might be relevant to other market participants.

Figure 164. UMM message publication wizard. Step 2
When all information is filled in, click [NEXT] (Figure 164) to review the UMM in wizard step 3.
The subsequent step must be performed according to the procedure described in section (6.2 ‘Confirmation of UMM’).
6.1.2. ‘Other’ template of UMM
The template ‘Other’ of UMM could be selected, when user wants to publish an UMM, which is not related to equipment failure or scheduled repair work.
After user clicks [OTHER] in the UMM publication wizard. Step 1 (Figure 163), the ETS will display the second step of wizard for providing information (Figure 165). The following information should be provided:
- (1) In the box ‘Message’ UMM shall be entered (e.g. the heat auction was not awarded, earlier/later start/end of a heating season or other UMM). Information shall be comprehensive, clear and accurate, to enable market participants to understand the essence of the event and to assess its possible impact.
- (2) The box ‘Company’ is filled in by the system;

Figure 165. ‘Other’ UMM message publication wizard. Step 2
When all information is filled in, click [NEXT] (Figure 165) to review the UMM in wizard step 3.
The subsequent step must be performed according to the procedure described in section (6.2 ‘Confirmation of UMM’).
6.2. Confirmation of UMM
The formed UMM will be displayed in the UMM publication wizard step 3 (Figure 166, Figure 167). After the user has made sure that all the provided information is correct, the user must send the UMM to the Operator for approval by clicking [SAVE AND SEND].

Figure 166. UMM publication wizard step 3

Figure 167. UMM publication wizard step 3
After Operator confirmation, the UMM will be published in the ETS and at www.baltpool.eu.
7. TRADING CALENDAR
Auction dates and a calendar of fuel product delivery periods are formed and published in the ETS. They can be viewed by clicking /Trading calendar/ in the menu. The trading sessions and delivery periods calendar window will be displayed (Figure 168).
In the calendar, the date of the nearest auction and the fuel products of all delivery periods which will be traded on the specific auction day are highlighted in green.
After the cursor has been placed on the auction date, the fuel products of all delivery periods that will be traded on the selected auction date will be highlighted in violet.

Figure 168. Calendar of trading sessions and delivery periods
8. BIOMASS PRICE
In the /Biomass price/ menu, the Operator publishes the average price of delivery of fuel (woodchips and wood pellets) under transactions concluded in the Exchange earlier for a specific month.

Figure 169. Biomass delivery price
After [details] has been clicked in the price table, detailed information about each fuel product group, i.e. the total average monthly delivery price for each product of the group and the average fuel delivery price for each specific product that formed in individual regions, will be displayed.
The delivery price of a specific product can be viewed by clicking the product name button (e.g. [SM1 (Chips )] above the table (Figure 170).

Figure 170. Detailed biomass delivery prices
9. AVERAGE BIOMASS EXCHANGE PRICE
The average biomass Exchange price can be viewed in /Average biomass Exchange price/. In the displayed window, the user must select the report parameters, i.e. the required instrument, county and delivery period. After the desired parameters have been selected, click [CHECK EXCHANGE PRICE].

Figure 171. Average biomass Exchange price window
The average biomass Exchange price report will be formed based on the selected criteria.

Figure 172. Average biomass Exchange price report